MUSICAL FEATURES
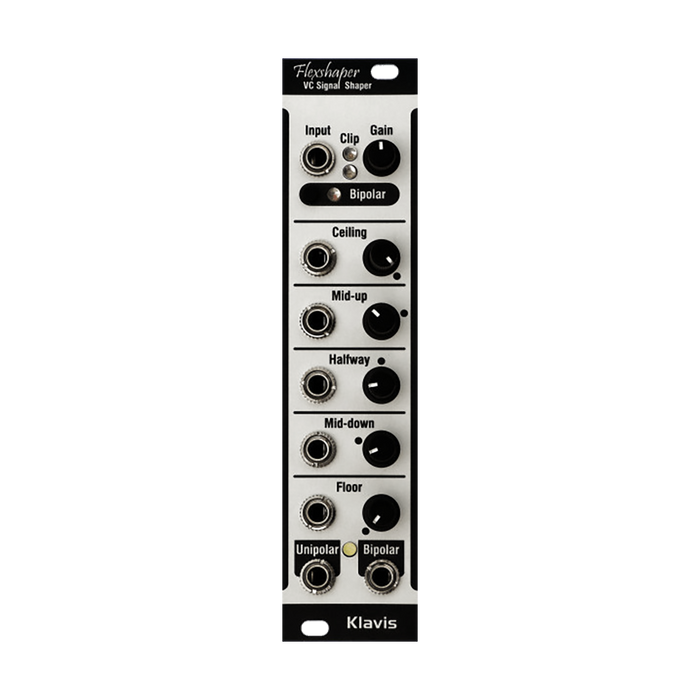
Klavis Flexshaper is an extremely versatile and flexible voltage mapper/waveshaper that can change incoming voltages to different directions and levels.It functions as a wave shaper by setting output voltages for five input voltages, creating a voltage mapping by interpolating between them, and converting them.
Versatile as an envelope shaping tool, frequency multiplier, waveshaper, clipper, distortion, limiter, curve changer, etc.CV inputgives you unlimited control over the placement of voltage processing points,Dynamically sculpt the signal.
- Can input signals from DC to full audio range
- Input mode can be switched between unipolar/bipolar
- LED indicating signal clipping
- LED indicating output signal status
- Input gain knob with configurable reference value allows for clean, flat clipping even when overdriven
- 5 knobs to manually map voltages
- 5 control CV inputs per voltage mapping
- Unipolar and bipolar output available simultaneously
- Easy firmware update via audio file
- Thin and compact design
HOW TO USE
Flexshaper is inspired by a modulation system called Tracking Generator implemented in Oberheim Matrix Synthesizers. This signal processor is part of the modulation matrix and can be virtually inserted between the modulation source and destination to change the shape of the control signal. Flexshaper also uses five shaping points to achieve the same concept, but the Oberheim version does not.We made the following two improvements.
- full signalAudio ratefast enough to process with
-
CVDynamically adjust 5 shaping points in real time via
Flexshaper can also handle bipolar and unipolar Eurorack signals well.
Concept of voltage mapping
The incoming voltage to the Flexshaper is divided into four continuous ranges defined by five points. The Floor and Ceiling points define the minimum and maximum voltages handled, respectively, and voltages above these ranges are interpreted as limits.The other three points are set evenly between the Floor and Ceiling points.
Each knob sets the output voltage corresponding to the incoming input voltage.For example, the "Halfway" knob defines how incoming voltages in the midrange are processed. For input voltages between three points, a voltage that is linearly supplemented with the output voltage set at the adjacent points is output.
like the image belowDotIf the knob is set accordingly, the output voltage will have the same result as the incoming voltage, i.e. no processing will be performed by the module.With default settings like this, each setting point is defined, such as ``If an incoming signal arrives in the mid-high range, it will go to the mid-high range.''
When setting the mapping,"If you input a sawtooth wave, the output will be the waveform set with the knob."It is a good idea to keep this in mind when making settings.The output when a triangular wave is input can also be considered as a combination of a sawtooth wave and an inverted sawtooth wave.compositionmanualSee also the list of settings starting on page 10.
black dot on each knobIn this position, the input and output will almost match.Also, the output value of each point isCan be controlled by CVBy dynamically changing the mapping, you can perform more versatile waveshaping.

NOTE: In reality, the input and output lines overlap exactly, but they are separated in this image for clarity.
Unipolar & Bipolar considerations
Flexshaper treats unipolar and bipolar signals differently.Properly setting the signal polarity is important to benefit from the full control range.Regardless of this input setting, the unipolar and bipolar outputs are available simultaneously, and the difference between these two outputs is twofold: voltage offset and overall amplitude.Of course, it is also possible to input a bipolar signal and obtain a unipolar signal as a result, or vice versa, especially when you want to use a modulation signal such as a bipolar LFO only for positive modulation. It is convenient for
The image below shows an example of processing a signal with two different input modes.The horizontal axis is the input voltage, and the vertical axis is the output voltage.The red Output can also be thought of as the waveform that is output when a sawtooth wave is input.

Module details
Input
-
Bipolar button & LED: Select the type of signal input to the module. Unipolar mode is when the Bipolar LED is off.
-
Gain button & Level LEDs: Adjust the Gain knob so that the green LED is always on for optimal dynamics.To prevent clipping, adjust the red LED so that it is not lit.
Outputs & LEDs
The two outputs produce identical signals with different offsets and gains, and these two can be used simultaneously.Typically, bipolar outputs are used for audio signals or LFOs, and unipolar signals are used for envelopes or similar positive-only signals.The intensity of the output LED represents a unipolar signal.With bipolar output, the LED being turned off indicates the maximum voltage on the negative pole, half lit indicates 2V, and fully lit indicates the maximum voltage.