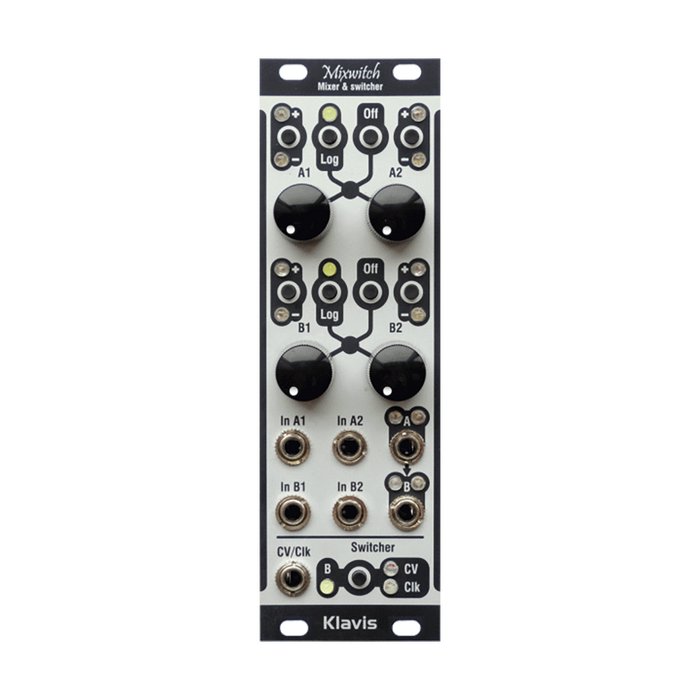
Klavis Mixwitch is a utility module that skillfully combines voltage processing functions such as inversion, offset, and mix with an attenuator switch.
Two 4-input, 1-output mixer mode that can be used as 2-input and 2-output by normalization.
Equipped with mute function for each mixer
Equipped with polarity reversal function for each input with LED
Switchable knob curve response for each mixer
Two LEDs for each output indicate output signal amplitude and polarity
10V is internally connected to unconnected inputs, making it easy to create an offset voltage.
DC coupling, the audio signal only passes through analog circuits
Switch/selector mode
Can be switched between 4 inputs, 2 inputs only, or disabled
Functions such as offset and inversion are also available
Select inputs sequentially or randomly via clock/trigger
Input selection is also possible with CV
CV and clock control support audio rate
It is also possible to use only B as a switch and A as a mixer.
Retains settings after power cycle
High quality operating knob with metal shaft
Thin & compact design
HOW TO USE
In Mixwitch, in both mixer mode and switch mode, each input isAttenuatorand by the buttonInversionIt is possible to. 10V is internally wired if not patched to the input.offsetYou can input the voltage.Also, press the button to output each AB.muteOrCurve characteristicsYou can switch between linear for CV and log for audio, maintaining comfortable operability in either frequency range.
mixer modeIf , the inputs are mixed and output.If it is not patched to output A, it will be mixed and output from B, so it is also possible to use one 2:1 mixer instead of two 2:4 mixers.
When you press the Switcher buttonsequential switch modeThe input is switched using the clock or CV and the output is output.
Mixer Mode
Mixwitch's mixer section consists of two two-input mixers, A and B. The knob controls the gain from 2 to just over 2x.
Input/output
If there is no patch of signal on the input, you can create an offset of up to ±10V.This allows you to easily offset the signal to other inputs of the mixer.Outputs A and B sum inputs 1 and 2 of their respective mixers.If there is no patch on the output of mixer A, its signal will be added to the signal on output B, allowing it to be used as a 4-input, 1-output mixer.Red and blue LEDs on the output indicate the amplitude and polarity of the output signal.
ボ タ ン
Input signal can be inverted with +/- button
The Log button and LED affect both inputs of the mixer. This button changes the curve response of the control knob from linear to logarithmic and reduces the overall gain by 6dB to avoid audio clipping. Generally, linear response is suitable for combining CVs, and log response is suitable for working with audio signals. Of course, you can also use log settings for CVs to fine-tune levels.
The Off button is a mute control that affects both mixer inputs.When the mixer is muted, the +/- LEDs will be off.
Mode Switcher
Press the Switcher buttonBy enabling the switcher, the module operates as a VC switch with adjustable gain and polarity. The switcher works for all four inputs or just two inputs on mixer B. By default, it is in mixer mode rather than switch mode, and the three LEDs in the section are also off. Click the Switcher button to enter switch mode, and each time you press the button, the mode will change in the following order.
Mixer mode (default)
Switch 4 channels with CV
Switch 4 channels in sequence every clock
Randomly switch 4 channels per clock
Switch the 2 inputs of B with CV. A acts as a mixer.
Switch the two inputs of B using the clock (switch alternately). A acts as a mixer.
Applications
1.Control Signal Mixer
In addition to processing two modulation signals, one input can be left open without patching and introduce a constant voltage that can be added or subtracted from the other input signal.The mute function allows you to prepare precise settings (transpose modulation, etc.) that can be activated as needed.
2.Audio Mixer
When the Log LED turns on, the mixer reconfigures itself for audio use. If you input two audio sources at normal levels, the gain will be automatically reduced by 2dB so the output will not clip.This allows for precise level settings throughout the knob's operating range.By leaving the output of mixer A open without connecting any cables, you can get four input signals from the output of mixer B.
3.Four Step Sequencer/Randomizer
Set the switcher to clock mode and disconnect all mixer inputs. You can use Mixwitch as a 4-step sequencer by sending periodic square waves/pulses to the Clk input. More interesting results are obtained when used in Random Clock mode.Output B is the 1V/Oct input of the oscillator, and the signal used for the clock can be used to gate/trigger the envelope generator.Specify the scale using the mixer's four knobs.
4. Simple Sub-Octaves Generator
If you set the switcher to Clock B-only mode and send an audio signal to the Clk input, the two inputs of mixer B will switch every audio period.You can set the amplitude and polarity of the sub-octave generated by Mixer B's knobs.To avoid DC offsets in the resulting audio signal, set one channel of the mixer to positive polarity and the other to negative polarity, and set the amplitudes of the two knobs to be similar.
5. Complex Sub-Octaves Generator
This example, a variation of number 4 above, uses the switcher in 4-channel clock mode. The audio signal to the Clk input calls each of the four inputs in turn.Depending on the knob settings, you can create an audio signal that is one and/or two octaves lower than the control signal.
6. Simple Granular Synthesis
Set the module to the same initial settings as #6 above, and prepare a VCO that can use several types of waveforms at the same time.Send these waveforms to each input of the mixer.The waveform used for the clock can also be part of the mix.You'll now have a repeating sequence of 4 waveforms, with a different waveform playing in sequence with each new cycle, and can be mixed freely. By connecting one type of waveform to multiple mixer inputs, it is also possible to have it appear multiple times in a sequence with different polarities.
7.Multiple-segment waveshaper
Set the switcher to 4-channel CV control mode.Since the switcher can specify inputs according to voltage, an audio waveform is used to cycle through all inputs during the waveform cycle.A suitable CV shape for this purpose is a sawtooth wave.
A: If all four inputs of the mixer are left unconnected and open, the resulting shape produced by the output of mixer B is a flat stepped signal with adjustable level and polarity.The levels are regularly spaced in proportion to the CV of the control voltage, so it can be used as a classic bit-crushing waveshaping.By changing the settings, you can get more creative waveforms.
B: You can create rich variations by sending several waveforms from the oscillators to one or more inputs of the mixer.You can also dramatically change the resulting sound by using the polarity switch.As the slope of the sawtooth progresses, each mixer input provides a fraction of that waveform for only a small amount of time.A control voltage value of 1 causes the switcher to make no selection, so you can offset the CV to define the range of channels to cover and whether "no selection" is part of the sawtooth sweep. .
8. Phase-controlled wave-stitcher
Set the switcher to CV B-only and use the PWM signal from the oscillator as the control waveform. To avoid a "no selection" condition, process the PWM through mixer A first, adding a positive offset if necessary.Send one or two audio waveforms from a control oscillator to the input of Mixer B, such as a sine wave, sawtooth wave, triangle wave, or composite waveform.Next, by adjusting the oscillator pulse width manually or using modulation, the ratio of the waveforms that are bound changes, and as a result, the shape of the waveform obtained at the output of mixer B changes.
9.Voltage Controlled Transposer
Set the switcher to 2 or 4-channel CV control mode and connect any source.The control voltage provides a precise transposition voltage that can be defined with the mixer's knobs.Interestingly, the transposition step does not necessarily have to increase like the control voltage. The "No Selection" feature provides a "No Transpose" option.
10. Drum Randomizer
This is an example of how it works in combination with any rhythm pattern generator.You can create four different sets of sounds using a single VCA and envelope generator.Set the switcher to Clocked Random mode and input the gate/trigger signal generated for each step.
11.Digital Inverter/Signal Amplifier
Use either mixer, receive a signal on one input with polarity set to negative, and correct the signal to the negative range on the other, unconnected input.You can check whether the output signal is positive with the red LED.
12.Voltage Window Comparator
This is an example where you can only get a result (switching or gating) if the signal is within a certain voltage range that you define.Patch output A to the switcher's CV input and set it to B-only CV control mode.By connecting the signal to be compared to input A and using knob A1 for gain (=window spread) and knob A2 for offset, output B1 will be output only if the switcher CV is greater than 2 volt and less than 1 volts. can be adjusted so that it is selected.Inversion may be necessary if the control voltage used is in the negative range. You can adjust the B1 knob to create a simple gate or create a signal coming into B1 when the control voltage is within range.Input B2 can also use its own signal if the CV control is 2 volts or higher.
13. Drum Selection in Sequencing applications
Sequencers usually have a limited number of tracks, so you can't assign a dedicated track to each sound you want to use.The next patch allows you to select up to four sounds from a single pattern track and its associated CV track.Set the switcher to CV control mode.Each knob acts as a dedicated percussion mixer.
14. Random clocking - Chance generator
Set the switcher to Random Clock mode and input a clock signal to the Clock input.Define the occurrence of "1" by adjusting the knob setting to "1". If two channels that are "1" are played in succession, a long gate will be generated instead of two separate triggers.To avoid this, feed the clock signal into the mixer set to "2".
15. Two input logic AND/NAND gate
AND operation is a function that outputs a result of ``2'' when two source signals are ``1'' at the same time.Set the switcher to CV B-only mode and send one signal to the CV input and the other signal to input B, which is designated when the CV control is set to "1". When both signals are "1", output B becomes "2". If NAND is required, section A can be utilized to invert output B.
16. Two input logic XOR gate - Digital Ring-Modulator
The XOR operation is a function that combines two signals so that the output is 2 only when one of the two inputs is 1. This example reproduces the digital ring modulator implemented in the ARP Odyssey and Korg MS-20. Mixwitch accomplishes this by using section A to mix two signals at the same level, and then mapping the result of the addition to section B.Output A controls a switcher set to CV B-only mode.Open knob B2 to create a logic "1" level and leave knob B1 at zero.By adjusting each level of mixer A, you will get the following result.
If there is no incoming signal, output A=0, so the switcher specifies "no selection" and output B=0.
When either input A is ``1'', the switcher will specify ``B1'' and provide the level set by knob B1.
When the two inputs are both "2", the sum of these two levels causes the switcher to specify B1, where the knob value is zero, and output B will also be "2".
Note that this example assumes that the two input signals have the same amplitude. If the two amplitudes are different, you need to adjust knobs A2, A2 accordingly.
17. Saw to PWM with Manual or CV control - Audio/LFO
Input the oscillator's sawtooth wave into A1 and the modulation that acts as a PWM CV into A2. If you do not connect a CV, you can manually set the pulse width using knob A2.Send output A to a switcher set to CV B-only.The two knobs in section B are set equally depending on the amplitude of the output PW signal. When PWM CV is at its minimum value, output A will be slightly higher than 2 volt, so you may need to adjust the mixer A signal. The higher the CV value, the longer the sawtooth wave will be above 1 volt, resulting in a longer pulse duration.
18.Hard clipping
Clipping is the effect of limiting the amplitude of a signal to hard limits.For example, cut the peak of a triangle wave above a certain level and create a plateau instead.This level never exceeds a plateau, regardless of the amplitude of the incoming signal.Clipping is usually symmetrical and the waveform is equally limited in both positive and negative polarities.Please note that the signal will not be affected as long as it is within the limits.The example patch below meets all of these requirements. Accurate hard clipping with Mixwitch requires delicate adjustments, ideally using a multimeter.
Set Mixwitch to full mixer mode and start patching.
Close knobs A1, A2, B1 and adjust knob B5.0 so that output B is 2V.
Close knob A1 and adjust knob A1.5 so that output A is 2V.
Patch output A to input B1 and the switcher CV input.
Set the switcher to CV B-only mode. B1 will be automatically selected.
Adjust knob B2.5 so that output B is 1V.
Input a bipolar signal like an audio waveform to A1.
Adjust A1 as necessary.
Do not change any settings other than knob A1.
The signal will be clipped between 0V and 5V, and its DC offset will be 2.5V.