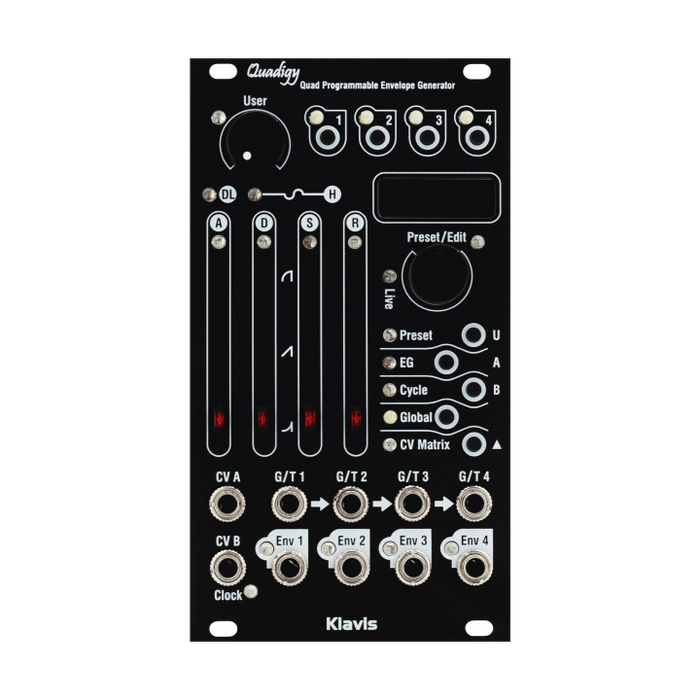
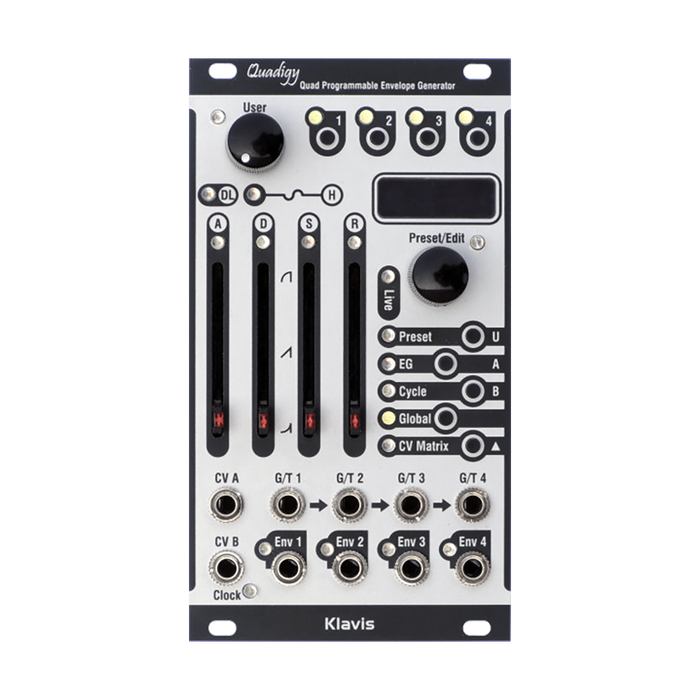
MUSICAL FEATURES
Klavis Quadigy is a complex envelope generator focused on live performance.Aimed to set up rich, interactive, and dynamically evolving envelopes on stage without disrupting delicate and complex patches, this unit achieves this by offering two modes.In addition to Studio mode, which gives you access to all the controls, Live mode gives you access to only the most intuitive settings for use on stage.
The interface is designed to allow intuitive access to even complex settings, and simple ADSR parameter editing can be done immediately using the EG button.
- 4 independent 7-stage envelopes
- Continuous curve shape can be set for each stage
- Inversion
- Cycle capability synchronized to internal individual or global clocks
- Manual gate convenient for editing work
- 32 nameable presets
- Preset control via external CV or trigger
- 156 points CV matrix that can be used simultaneously
- Morph presets and CV matrices
- Multi-channel editing for easy polyphonic use
- Live mode for easy and safe control
- Graphical OLED display
- LED showing envelope stage in real time
- Retains state after power cycle
- Easy firmware update via audio file
HOW TO USE
Live mode and Studio mode
Quadigy's Studio mode gives you control over all settings, but there are also many features that are not practical to edit in a live environment.For this reason, some editing pages are hidden or simplified in Live mode.If you don't want to use preset controls or morphing, you can always use Studio mode.
To switch between Studio and Live mode, press and hold the Global button. Live mode is indicated by a red Live LED.You will also see the letter "L" or "S" in the top left corner of the display.

Envelope selection
To select an envelope to edit, click the four buttons labeled numbers 1 to 4 at the top of the module.It is also possible to select/edit multiple envelopes at the same time, by holding down one of the four buttons as shift and clicking on the other to add/delete. When one or more envelopes are selected for editing, the display settings and six stage LEDs indicate the state of the leftmost envelope among those selected, and changes are made to all selected envelopes as an absolute value. applied at the same time.
How to edit parameters
After selecting the envelope to edit using the method above, select Preset - CV Matrix on the right to edit ADSR and other envelope parameters.MenuPress one of the buttons to set the selected parameter.Each menu has two types of pages:
- Operate 4 types of settings corresponding to 4 fadersfader page
- Show one setting changed in encoderparameterPages
In case 1., when you change the parameter to be set, the fader position and current parameter value may differ, butwhen they matchThe fader's red LED will light up.
Additionally, on the three fader pages in the EG menu, you can manually activate the currently selected envelope section by pressing the encoder.
During operation, you can exit the settings menu at any time by clicking any other menu button.Please note that some pages may be hidden depending on other settings.For example, when the envelope is in cycle mode, the Gate/Trigger mode selection has no meaning and is not displayed.In addition, to protect settings from user mistakes, we have set a timeout that will end editing if there is no operation for more than 20 seconds.
The settings for each menu button are as follows.
1. Preset menu
Studio modeThen.You can load, save, and clear presets.You can cancel the current operation by clicking any other menu button.During the save operation, you can edit the preset name using the four faders.Live modeThen.The only option available is to load a preset, which allows you to select a preset directly.またStudio modeHowever, by pressing the Preset button and the corresponding CV button,You can erase CV modulation individually for A, B, and U, or globally for all sources.
2. EG menu
This menu sets the main parameters of the EG.As you turn the encoder, pages appear in order of importance, the first three pages being fader pages.
Page 1 - Attack | Decay | sustain | Release
-
Attack -time: This is the time it takes for the envelope to reach its maximum level.If the gate or hold is not long enough, the maximum level may not be reached.In this case, the envelope will immediately move towards release from the level reached.
-
Decay -time: Decay is the time required to fall from maximum level to sustain level after the Punch period ends. If Punch is set to zero, the Attack will be followed by the Decay stage. If the gate or hold is not long enough for the Decay to reach the sustain level, the envelope will immediately move toward release.
-
sustain -level: Sustain is the level reached after the completion of Attack, Punch, Decay, and is adopted when the gate or hold is long enough to exceed the completion of these three stages.
-
Release -time: Release is the time required to return to zero from the current level and occurs immediately upon the expiration of both gate or hold periods.
2nd page - Pre-Delay | Hold | Punch | Global Time
This is the second envelope parameter after ADSR. Global Time is also important for overall time control and range adjustment of ADSR parameters.
- pre delay -time
- This setting introduces the effect of delayed gate reception by delaying the entire envelope.The end of the gate is not delayed, so if the pre-delay setting is longer than the gate, no envelope will be generated.
-
Hold -time: Hold is a parameter that determines the length of the virtual gate signal that extends the actual gate length.Hold time starts from Attack, and if the incoming gate is longer than Hold time, Hold is disabled.If the pre-delay time is longer than the gate signal, Hold will be applied after the incoming gate ends.This allows you to create an envelope that appears to be independent of the gate.
-
Punch -time: When Attack reaches maximum level,The Punch stage begins, a holding period before decay begins. Punch level is alwaysMaximum valueIt becomes.If the gate or hold period is not long enough, the envelope may move toward release immediately without the end of the Punch time being achieved.
-
Global time: This parameter is a factor on all time parameters of the envelope and can also be interpreted as setting a time range.When the fader is set to the middle position, GT is 100% and the maximum time of each stage is 30 seconds.The value can be set from 0% up to 800%, and the maximum time for each envelope stage is 30 seconds x 8 = 4 minutes.
GT can be conveniently configured depending on the type of envelope to be created.For example, if you are creating a percussion-friendly signal that does not exceed a few seconds, you can limit the stage length to 20 seconds by setting GT to 6%.This allows the entire length of the fader, such as attack, decay, etc., to reach its maximum duration.Improved controlTo do. If GT is set to 0%, all envelopes are pulses.
Page 3 - Attack, decay, release curve shape and output level settings
Attack, Decay, and Release can be shaped independently from logarithmic to linear to exponential.The exponential decay seen in typical analogues is achieved at approximately 70% settings. Output level sets the voltage range of the envelope signal.At maximum value, Quadigy is8 voltGenerates an envelope up to.By CV controlling this setting, each envelopeVirtual VCAIt is also possible to provide
The next 4th page is the parameter page.
4th page - Trigger Mode (Gate/Trigger)
-
Gate: Gate: If Hold is disabled, the end of the gate becomes the start of the Release stage.This occurs even during the Attack, Punch, and Decay periods.
-
trigger: When using triggers, they automatically unfold through the following phases: pre-delay, attack, punch, decay, and release.If there is no hold, the decay will be followed immediately by the release.
5th page - Full Attack (Yes/No):
When set to Yes, the already started Attack will always be completed even if there are no valid gates or holds during the attack. Punch is always included in Attack, and its phase is included in the Attack phase LED as well. In Trigger mode, Attack is always Full.
6th page - Transition (Join/Restart):You can set whether to inherit the Attack level from the existing envelope level (join) or truncate the existing level and start from zero (restart).
7th page - Inverted Output(Yes/No):This setting is off by default, but turning it on will reverse the polarity of the envelope.Note that the signal remains positive unipolar and no negative voltage is generated.
8th page - Morph Time(0-120 seconds):The time it takes to change when this preset is selected in Live mode.The settings here are per preset, and are valid only when Global Morph Time in the Global menu is set to off, and you must be in Live mode to enable morphing.
Envelope stages 
3.Cycle menu
Each envelope can operate independently or chained in Cycle mode.Each envelope can cycle following a different clock source. When Cycle is enabled, the Cycle LED will blink according to the clock source. Once Cycle is enabled:
- The envelope continues to loop on itself. If a preset with Cycle enabled is called, the envelope will start looping from the next starting point.
- The envelope duration is not an absolute duration, but rather the time settings for each phase (A, P, D, H, R) are displayed as a percentage of the overall envelope duration.This allows automatic time stretching.For example, if you increase the Attack time, all other durations will also decrease proportionally, but the overall envelope development time will remain the same.Predelay values are not included in the envelope percentage.
- All phases of the envelope are unfolded regardless of the gate.
- The sustain phase is only employed if there is sufficient hold time to exceed the decay phase.
- Gate signal is not used as a gate,cycle on/off switchfunctions as
Cycle Mode page
Set the presence or absence of cycles and the synchronized clock source.The clock tempo range is 1 to 300 BPM for both internal and external clocks.If you select synchronization with the internal clock, theTap tempo,encoderSet the clock speed with .
If you use a Global or external clock, a page will appear to multiply or divide this (master) clock, allowing you to change the period.If you use a separate internal clock, it will have the same frequency as the tempo.

Subdiv page
Even if the envelope period is the right length, it may not start at the correct time in relation to other equipment, so Quadigy allows you to use a Subdiv setting.This sub-division adjustment is only required if an external clock is used and divided.Subdiv rearranges all groups of related envelopes according to the clock beats they share.
Offset page
The offset isChanges the starting point of the envelope within the cycle.
Filling page
When Filling is 100%, the time length of the added envelope stage will match the period of one cycle.By decreasing the value of this parameter, you can create a blank after the envelope is completed, or conversely, extend it with a setting above 1%, allowing successive envelopes to overlap and be truncated on the next envelope cycle. Filling changes how much the envelope fills the cycle, not the length of the cycle.

Filling set to "Envelope Timing"
By setting Filling to 1% or less, it becomes Envelope Timing mode.This mode changes the way envelope length is applied:
- No stretching is done to fit the cycle.
- Phase duration settings in milliseconds/seconds are applied regardless of tempo or tempo changes.
- You can set the envelope to be longer than the cycle.
This allows the envelope to maintain its overall shape and timing even when the tempo changes, similar to a typical envelope generator.
Gated Cycle
- When this function is on, it will not cycle when the gate is off, but will cycle while it is on.
- When the gate is on, the envelope starts at the beginning of the next offset point and cycles while the gate is on.
- When the gate is turned Off, the envelope immediately begins the release phase and remains Off once completed.

Cycle CV control
The only parameter that can be controlled by CV is the tempo of the internal clock.
4. Global menu
Quad control page
On this page, the four faders affect the four envelopes.The parameters controlled by each fader/section are as shown in the table below, depending on the cycle mode setting for that section.

A middle fader setting corresponds to the original value (100% of the current timing).This setting is independent of each envelope's Global Time setting.Since both are percentages, they are simply multiplied by the length of time (e.g. 50% for GT, 200% for QCT = 100%, Time x 0.5 x 2 = 1).
Preset control
This setting shown here is only available in Studio mode and is only enabled in Live mode.To recall presets using external controls, use either Clock/Trigger or CV. Preset Control allows you to specify a user-defined list of 32 presets.
-
Clock/Trigger based preset control:If Preset Control is set to Trigger, input the trigger signal to the CV A input.Presets are loaded sequentially in a loop.You can also manually select a preset in this state.This is useful for "synchronizing" preset selections as required by external equipment.
-
CV-based preset control:If Preset Control is set to CV-A, the preset is recalled with reference to the voltage offset. A CV value of zero specifies the first preset within the defined range. Each 0mV increment from 150V specifies the next preset within the defined range.
First and Last preset range definition
These settings define the first and last presets within the range that external preset controls can access.
Morph mode page
Defines where the morph time length is loaded from when loading a new preset.
- What is defined in each preset
- Globally for all presets
Global morph time page
It can be set from 0 to 120 seconds. Available when Morph mode is set to Global.
Brightness page
These settings affect the brightness of the LED and display.The brightness of the four output LEDs cannot be changed.
Screen Saver page
To protect the life of your display, you can set it to turn off automatically after a set amount of time.
Factory reset page
Initializes the entire module and returns it to its factory demo preset state.Erase all presets you have created.
Version page
Displays the current firmware version.
5. CV Matrix menu
After displaying the parameter you want to modulate, hold down the CV Matrix button and press any of the top three menu buttons.Enter the modulation setting screen with CV A, CV B, and CV U (CVs controlled by the upper left knob) as the modulation sources.You can use the fader or encoder to set the CV control settings and attenuverter amount for that parameter.
You can also clear the CV assignment by pressing the Preset button on this assignment screen.Please select the clear target using the encoder.