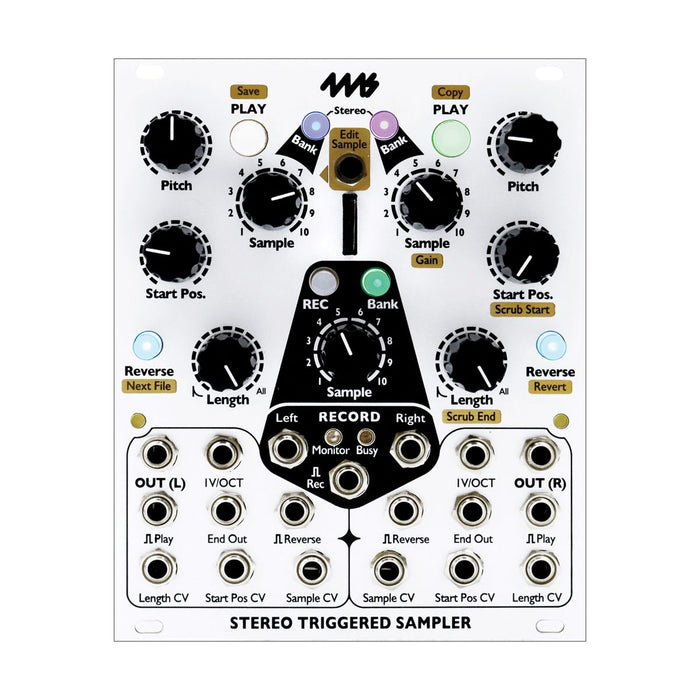
Format: Eurorack
Width: 20HP
Depth: 25mm
Current: 145mA @ + 12V, 39mA @ -12V Manual pdf (English) (The button combo chart at the end is convenient)
MUSICAL FEATURES
4ms Stereo Triggered Sampler (STS) is sample recorder / playback module of the high-quality sound. A different stereo file can record it independently while playing two stereo files in STS. From microSD cardUp to 600Sample up to Can load; 1 file4GBIf it is stereo wav of (16bit / 44.1kHz) considerably supports for six hours 40 minutes. The sample file can use the stereo wav file of various formats to 96kHz / 32 bit. MicroSD card is enclosed, and the sample by Richard Devine , Robert Aiki Aubrey Lowe, Joseph Pailo, Paul Barker, Baseck and others is collected, too.
AgainSample mode to editThen, as for the assignment of filing it, the copy, a change and preservation are possible on the reproduction condition every sample slot a gain, a trim start endpoint, reproduction. If it uses this function, I begin to talk about an individual drum hit as slice from one file (eg, a drum loop), and it is enabled in the main body I increase gains and make the sample with the accent particularly, and to increase variations. I perform these operation without changing Wav file.
Voltage control is possible, and all sample parameters of 1V / Oct, sample choice, length, the start position can realize the following thing immediately.
One-shot/looping sampler
Basic Granular Synthesis and thyme stretch
The table tennis loop which triggers each other's channels in End Out
The beat chop that it was controlled the voltage using the slice
Automation sampling using trigger input of the recording
Long-time performance recording
I may do a more progressive patch in combination of 2 channels and utilizing voltage control.
Other characteristics are as follows.
I can load it to 600 samples (in 1 bank 10 samples, 60 banks).
It is with the microSD card which samples more than 200 were recorded in. The sample which various artists made including Richard Devine and Robert AA Lowe, Baseck is attached.
The wav file in the microSD card cannot be deleted by a module. When a file assigned a sample slot by recording and a copy is changed, other than the editing with the mode to edit, Wav file in itself is left to the same microSD card ..
Very design with a few noise and jitter
It is recorded, and the audio system which I recorded can access the microSD card immediately.
I work with a stereo or a monomode. I push and hold two Bank buttons for a few seconds, and, please change it: ・ A stereo mode: I mix the audio system of the stereo from two channels and output it from Ls and Rs as a stereo ・ A monomode: I output an audio system output as a thing by each channel from Ls and Rs each.
The firmware update to stop by to pour it of the audio system is possible
The explanation of all parts is displayed in mouse over The function indication with the mode to edit is possible.
MEASUREMENTS
Choice of the bank
I can choose a sample slot reproducing every channel in STS. The sample is put in one bank by 10 samples and can control the sample in the same bank other than a knob in CV. 60 banks are distinguished from the color of the bank button using blinking.
The bank which is chosen when I push the Bank button changes with this turn. In addition, a button turns on first, but moves to White flashing on and off once when I push the Bank button at the time of Pearl turning on. I push The Bank button while pushing the Reverse button when I return a bank to the opposite direction. By this bank choice method,The empty bank without the sample skipsLeave and is not chosen. When the empty bank wants to select, please push the Bank button while pushing the Edit button.
In addition, to perform the movement between far-off banks quickly;Quick choice functionBut, there is it. I adjust the Sample knob of right and left while pushing the Bank button of the channel which I want to change. I change the color (ten colors) of the reproducing sample bank of the channel of the Bank button when I turn Sample knob of the L side. The blinking state of the bank does not change it. I change a blinking state of the reproducing sample bank of the channel of the Bank button when I turn Sample knob of the R side. the bank does not change it.
Mode to edit
The mode to edit is a nondestructive editing feature every sample slot to perform while pushing the Edit Sample button of the upper module center.L channelA sample loaded becomes targeted for editing. I show the function of each knob and button in the mode which a caption of the panel gold of high purity back edites. The information that is edited unlike control of Start Position and the channel volume hereInformation to be set to every sample slotThe neighbor, microSD card can save it.
The following operations are possible.
Gain adjustment: I coordinate the reproduction gain of the sample when I turn the Sample knob of the R channel while pushing the Edit Sample button. When the original gain adjustment to 10% --500% raises a gain too high by possibility, clipping happens. This is different from the channel volume adjustment in quantity of gain assigned each sample.
Can reproduce; the adjustment (trimming) of the range: In Wav file, I can coordinate reproduction start position (Scrub Start) in Start Position = 0 when I turn the Start Pos knob of the R channel while pushing the Edit Sample button. In addition, I can coordinate reproduction end position (Scrub End) in Length = 100% when I turn the Length knob of the R channel while pushing the Edit Sample button. I change distance at longer time when I turn the knob like a brick. I can perform assignment (slice) of a different reproduction point every sample slot from the same wav file when I put a copy function below together. In addition, I can use it for the cuts such as a too much long silence part, the noise.
I change the assignment of the reproduction file of it: I can change a file assigned a current sample slot by the combination of Edit Sample button and Reverse button of the L channel.
I choose the current folder with alphabetical order
I choose the Wav file which is not used among all sample slots in turn
I choose all samples (used wav file) in all banks among the first bank sequentially
I choose the first sample file of the bank when I push the Reverse button for two seconds while pushing the Edit Sample button. When I have already chosen the beginning of a certain bank, I choose the first file of the bank before one. In addition , I play it from the first sample file of the first bank sequentially when I keep on pushing the Reverse button while pushing the Edit Sample button.
It is copied the sample file (virtual): It becomes the movement with the mode to edit when I continue pushing the R channel Play button for 0.5 seconds while pushing the Edit Sample button and pastes virtual copy & of the sample. The copy does not really copy a file and renews sample assignment information to access one file from plural sample slots (even if a trim point or the gain point at the same file, it is changeable to every sample slots).
I assign the sample slot of the L channel an origin of copy file, and the R channel, please choose a bank sample slot of the copying properly. Copying is completed when I push this button for 0.5 seconds while pushing the Edit Sample button here, and the slot of the R channel comes to refer to the same file.
The preservation of the result that I edited: The result to edit mentioned above, the assignment information of a file recorded again at that pointTemporaryIt is lost once the power is turned off. By holding down the Edit Sample button and pressing the L channel Play button for 0.5 seconds, these sample edit results are saved on the microSD card, and the results will be reflected the next time the power is turned on.
Discard edited result (Revert): It is possible to discard the temporary edits made with the sample edit function, or to return to the state at the time of the previous save (only before saving).
Hold down the Edit Sample button and press the right Reverse button for 0.5 seconds to edit the sampleundocan.
Press the L channel Bank button for 2 seconds while holding down the Edit Sample button and the R channel Reverse button, and the current L channelSelected bankDiscards any temporary edits made to the samples in and reverts to the last saved state.
Hold down the Edit Sample button and the Right Reverse button and press both Bank buttons for 4 seconds.All banksDiscards any temporary edits made to the samples in and reverts to the last saved state.
SD card folder structure and file bank assignment rules
A microSD card is included with the module. STS requires a microSD card with a fast access speed.UHS Class 3 CardPlease use (the one with 3 mark in U). ExFAT is the best card format, but it works with FAT32. Also, do not remove the microSD card from the STS when the Busy LED is on or flashing.
Each folder directly under the microSD card becomes one bank
Put the Wav files you want to put in each bank directly under each folder (sub folders are ignored)
Do not use Japanese (double-byte) characters for file and folder names.
Banks and files are assigned in alphabetical order by folder name and file name.
By prefixing the folder name with the name of the bank color and the number of flashes, the folder is assigned to that bank with priority. "Orange ~" is assigned to the bank that always lights Orange, and "Orange-1 ~" is assigned to the bank where Orange blinks once.
Wav files can be 32-bit floating point, 16/24 / 32-bit signed, 8-bit unsigned bit rates, and sample rates from 8kHz to 96kHz
A file named __Sample List __. Html is created in the top folder of the microSD card, and the file name and length of the assigned sample are displayed. It can also be used for copying and browsing on mobile etc.
The _STS.system folder contains the results of editing. Make a backup of this folder to save previous edits such as sample assignments, gains, loop range information, etc.
Recording procedure
To start recording, first press and hold the REC button to enter the recording standby state (arm). Patch the audio you want to record to the RECORD input. For things, patch to Left only. Then press the REC button to actually start recording Press this button again to stop recording. Recording can be started and stopped using the trigger input.
The recorded wav file is automatically assigned to the sample slot set by the recording Bank button in the center and the recording Sample knob. Recording Bank is turned on when the power is turned on.First bank with no samples assignedIs automatically assigned, but you can change the bank by pressing the Bank button as usual. If another file is originally assigned to the slot to which the recorded file is assigned, that assignment will be canceled at the time of recording, but the file will It is also possible to re-assign by changing the assignment in the edit mode described above. Also, the assignment result is temporary at that point and will be lost once the power is turned off. By using the sample edit save function, the assignment information is saved on the microSD card.
To quickly move the bank of the L or R channel to the recorded bank, hold down the Record Bank button and press the Bank button of the channel you want to move for 0.5 seconds.Warp to recording bankI can do it.
Example of slice creation using copy function
1. Load the slice source sample file (drum loop, etc.) to the L channel
2. Load the bank where you want to create a slice on the R channel. If you hold down the Edit button and press the Bank button, you can select a bank that has no samples at all.
3. Set the R channel's sample knob to the slot where you want the first slice
4. Hold down the Edit button and press the right channel Play button for 0.5 seconds to assign the same file as the left channel to the right sample slot
5. Copy from L to R as many slices as you want while changing the sample slot of the copy destination
6. In order to process the sample that will be the basis of the newly created slice, make the L channel the same bank as the R channel
7. Select the sample copied earlier on the L channel, cut out part of the sample file (one drum hit) using the sample edit function, adjust the gain etc., and do this for all the copied samples
8. If you like these slice edits, hold down the Edit button and press the L channel Play button for 0.5 seconds to save the result
system mode
Press and hold the 4 buttons, 2 PLAY buttons, 2 Reverse buttons, REC and REC Bank buttons for 4 seconds to enter system mode.
Rec button: PressRecording bit numberSwitch. The button color is 24 bits when blue and 16 bits when red.
L channel PLAY button: When pressed,Role of PLAY button when LENGHT = 100%Change Blue indicates that the sample will be triggered / retrigged in the same way as when LENGTH is not 100%, but red indicates that the sample will be played or stopped. (Trigger input always works with trigger / retrigger)
R channel PLAY button: when you change the sample to playContinue playing the original sampleSwitch. When green, switching to a new sample stops playing the current sample. When red, sample playback does not stop
firmware Update
Firmware update is performed by pouring the downloaded audio file from the STS REC jack.STS product pageDownload the latest firmware wav file from the "Manual / Firmware" tab and update it according to the following procedure.
1. Unplug all cables from STS and power on
2. Press 2 PLAY button, 2 Reverse button, REC button, REC Bank button for 4 seconds to enter system mode
3. Press the two bank buttons, REC, REC Bank button for 4 seconds.
4. The left Play button should be green. If the left Reverse button is green, press it once to restart the boot loader. If you accidentally enter the bootloader, you can press and exit when the Play button is green The Monitor and Busy lights will particularly light
5. Connect the audio output of your computer or smartphone to the Record jack on the left.
6. You can also hear the sound from the left Out jack (note that the sound is loud)
7. Set the computer's software and hardware volume settings to 100%. Please turn off all notification sounds
8. Start playing the file.
9. If the sound stops before the end of file playback, it is an error. Reverse lights green and the four LEDs light.
a.Stop the file and return to the beginning b.Make sure the cable is connected properly c. When you press the Reverse button, the LED goes out and PLAY lights up green. d. Start playing the file again
10. If the firmware file loads properly, STS will beep and restart