MUSICAL FEATURES
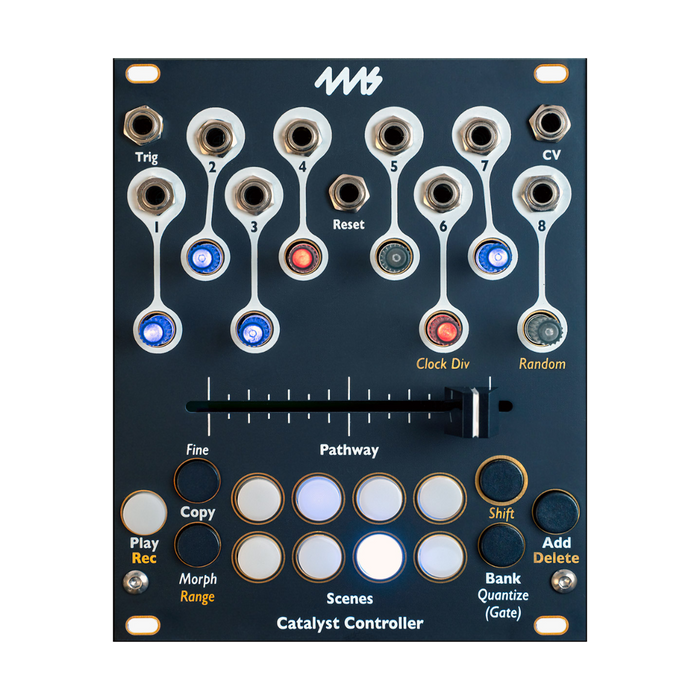
Catalyst Controller8 precision CV outputsand for transitioning between scenes.Cross faderIt is a macro controller with .sceneis a snapshot of up to 8 CV outputs, which is like a modular preset. Use the crossfader or external CV signal to transition through "pathways" made up of multiple scenes, or use the scene buttons to jump instantly. It is also possible to record scene control CVs and slider movements and play them back via buttons or external triggers.
Each output has submillivolt accuracy and ranges from -5V to +10V. Channels can be used to adjust morphing curves, quantize, limit to a specific voltage range, or set as gate outputs.
As a CV preset manager, seamless transition generator, chord sequencer, CV recorder, or experimental CV playground, Catalyst Controller puts control of your modular system at your fingertips.
Catalyst Controller can also be transformed into Catalyst Sequencer! Long press a special button combination to switch between controller mode and sequencer mode. If you prefer the sequencer, you can also remove the faceplate and reinstall it on the other side to reveal the sequencer's panel design.
Catalyst is designed and produced by Emblematic Systems.
Features
- Smooth and responsive crossfade morphing between scenes
- 8 output channels, each channel can be configured as CV or gate
- Place scenes in pathways with up to 64 scenes
- Morph from scene to scene along your pathway with a smooth, responsive crossfader
- You can set slew/lag to limit the speed of scene changes
- Adjustable morph time for each output
- Control crossfading with external CV
- Up to 20 seconds of recording and playback of CV and crossfader movements
- CV output can be limited to -5V to +10V, or +/-5V, +5V, +3V, or +1V
- CV output can be unquantized (sub-1mV resolution) or quantized to common scales
- Channel value/gate randomization
- Copy/paste function
- Design based on Emblematic Systems' original Catalyst
How To Use
Channels
Each of the eight channels has an output jack and knob. By default, all channels output CV. When outputting CV, turning the knob adjusts the output level of the jack. The knob changes color and brightness to indicate the level present on the jack. Blue is positive voltage, red is negative voltage, off is 8V. The further the voltage is from zero, the brighter the light will be. Levels set with the knobs are saved in the active scene. If you are crossfading between two scenes, the levels of both scenes will change.
Each click of the knob changes the level by a semitone, or approximately 83mV. If you hold Fine and turn the knob, the level will change by 4 cents, or about 4mV.
Output level can be adjusted from -5V to +10V. You can limit this range if necessary. Channels can output gates instead of CVs. See the channel mode description for details. You can also adjust the crossfade curve for each channel and select the scale to quantize.
Scenes and Pathways
Scenes
A scene is a snapshot of each channel's output level. By connecting the Catalyst Controller's outputs to various locations in a modular patch, you can think of a scene as a "preset" within the patch. The active scene can be determined by the lighting of the scene button. If two or more Scene buttons are lit, the channel output will be a crossfade of those two Scenes, and their relative presence in the mix will be represented by their relative brightness. Normally, when you press a scene button, the voltage of the channel in that scene will be output as long as the button is held down. If the scene button is not pressed, the output will be the scene or mix of scenes selected by the crossfader in the current pathway. There is also a special mode called "Blind Mode" (described below) that allows you to view and edit scenes without changing the output by holding down the scene button.
Pathway
A pathway is two or more scenes that crossfade. When you turn on a new Catalyst Controller for the first time or after a factory reset, the pathway containing scenes 2 and 1 is automatically loaded. As you move the crossfader back and forth, the button light will fade between scenes 8 and 1. The output jacks also fade their voltages, and the knobs also fade the colors between the levels set for these two scenes.
Adding a scene
Scenes are always distributed evenly along the pathway. To add a scene, move the slider to any position between two existing scenes, then press and hold the Add button. The two scene lights should now be lit. A new scene will be added exactly in between these two scenes. This is regardless of how close the crossfader is to either existing scene. If only one scene light is on when you press Add, move the crossfader slightly in the direction of the adjacent scene.until the two lights come onAdjust. For example, if you start with the default pathway (1 -> 8), move the crossfader to the middle of the pathway (or any position between scenes 1 and 8), then press Add + scene 2, the new pathway will be It becomes 1->2->8.
If you hold down the Add button, you'll notice that some knobs turn green. The number of green knobs indicates the number of scenes in the current pathway. If you continue to add more than 8 scenes, the knob will change color. Scenes 9 to 16 are yellow-green, and the color gradually changes to yellow for each group of eight, and then to red as the total number approaches the maximum of 8.
If you want to quickly add multiple scenes, you can press and hold the Add button and press the scene buttons you want to add in sequence. For example, if you have 1->2->8 and you move the crossfader between 2 and 8, you can hold Add, tap scene 3, then tap scene 4. This makes the pathway 1->2->3->4->8.
Replacing a scene
If you want to replace a scene with another scene, move the crossfader to that scene's position, hold Add and tap the new scene button. Only one scene button should be lit while the Add button is held down. If both lights are on, move the crossfader closer to one of the scene positions andUntil only one light comes onAdjust. The lit scene will be the scene to be replaced.
Continuing with the previous example, if you move the crossfader all the way to the right (scene 8 position) and press Add + Scene 5, scene 8 will be replaced by scene 5. At this point, the pathway is 1->2->3->4->5.
シーンを置き換えた後にAddボタンを押し続けていると、置き換えたシーンの後にさらにシーンを追加することができます。したがって、前の例でシーン5をタップした後にAddを押し続け、その後にシーン1、そしてシーン2、6、7をタップした場合、パスウェイは1->2->3->4->5->1->2->6->7となります。
Latching a scene
Normally, pressing a scene button will jump to that scene for as long as the button is held down. The Scene Replace feature allows you to keep a scene active even after you release the scene button. This is called latching the scene. Please note that latched scenes will be overwritten when you apply CVs or play recorded movements.
Deleting a scene
To delete a scene, move the slider to that scene's position and hold Shift + Add. One or more scene buttons will light up. Pressing any of the lit buttons will remove that scene from the pathway.
When you delete a scene, the corresponding light turns off and the next available scene lights up. You can also move the crossfader to select which scenes are lit. If you want to delete multiple scenes at once, you can do so by holding down Shift + Add and tapping the lit scene button. The last two scenes cannot be deleted because at least two scenes are required to form a pathway.
Banks
There are 8 banks, each with 8 scenes. To see which bank you are in, press and hold the bank button and see which white scene button is lit.
You can select a different bank by holding the bank and pressing the scene button.
Each bank has its own pathway, and changing banks will load the pathway for that bank. All scenes within a pathway must belong to the pathway's bank. If you want to use a scene from another bank, you can copy/paste it into the current bank.
Channel Modes: CV, Gate and Quantization
8 channels can be configured to output CV or gate.
CV Mode
By default, each channel outputs CV without quantization to scale. The knob is blue for positive voltage, red for negative voltage, and off at zero volts. The farther the voltage is from zero, the brighter the color. The maximum positive voltage is +10V and the maximum negative voltage is -5V (this range can also be limited in the settings). Each click of the knob changes the output by a semitone, approximately 83mV or 1/12 volt. If you hold "Fine" and turn the knob, the voltage will increase by 4 cents, or about 4mV.
Changing CV/Gate mode and Quantization
Hold Bank/Quantize and all knob lights will turn dark gray by default. This color indicates no quantization.
Holding the Bank/Quantize button and turning the knob will select a different scale for that channel. The knobs will change color as follows:

Gate mode
By holding Bank/Quantize and turning the knob until it turns green, you can set that channel to be a gate output instead of a CV output.
Adjusting a channel's knob in gated mode changes the pulse width. If the knob's light is off, there will be no gate output for that scene. Turning the knob increases the pulse width of the gate and changes the light from dark green to bright green. The minimum pulse width is 2ms and the maximum pulse width is 500ms. The gate pulse amplitude is +5V.
If a channel is set to gate mode, the gate will fire whenever the scene containing the gate is activated. Crossfades are not possible in this mode. For example, pressing a scene button fires the gates of channels that have gates in that scene. Also, if you crossfade from one scene to another using the crossfader, CV, or recorded motion, the gate will fire whenever the crossfade from the scene with the gate begins.
Automation
There are several ways to automate crossfades.
CV crossfade
Inputting CV into the CV jack has the same effect as manually moving the crossfader. The CV jack accepts voltages from 0V to +5V, with 0V selecting the first scene in the pathway, 5V selecting the last scene, and everything in between crossfading along the pathway.
The pathway position set by CV is added to the position set by the crossfader, so both can be used at the same time. If the final position exceeds the last scene (for example, if you input 4V as CV and the crossfader is in the 75% position to the right), the position will move from end to beginning as if the pathway were circular. Wrap around.
Through
Thru adds "friction" and "delay" to the crossfader and CV movements. By default there is no through, and the position on the pathway tracks the crossfader and CV perfectly. When through is added, the pathway changes slowly even if the crossfader or CV changes suddenly.
You can adjust the through by holding down the Shift button and turning the channel 7 knob. When you raise the slew, the knob will start to turn pink. In small doses, the effect is almost imperceptible. When you turn up Thru, you'll notice that if you move the crossfader quickly from one side to the other, the pathways will slowly crossfade, as if you were moving the crossfader slowly and steadily. At maximum settings, it takes about 4 minutes to move the pathway if you quickly move the crossfader from one side to the other.
Hold Shift + Fine while turning the knob to adjust the slew in smaller amounts.
As an advanced feature, the slew response curve can be changed between linear and exponential (see diagram). You can adjust the slew curve by holding Shift and turning the channel 5 knob: the knob turns white for linear and yellow for exponential. The difference is often difficult to hear, but sensitive applications may prefer one curve over the other.
Recording motion
Crossfader and CV movements can be recorded for up to 10 seconds and played back to automate movement through the pathway.
To record motion, first enable recording by holding Shift and tapping Play. Release the Shift button and the Play light will flash to indicate that recording is armed. To start recording, press Play or send a trigger to the Trig jack. Move the crossfader or apply CV to the CV jack. While recording, the Scene buttons flash in sequence from 1 to 8, indicating what percentage of the maximum recording length has been used (each Scene button represents approximately 1.25 seconds).
When finished, press Play again or send another trigger to the Trig jack. The recording will be played once immediately.
To play the saved recording at any time, tap the Play button. The module behaves as if you were moving the crossfader (or inputting a CV) in the same way as when recording.
If you accidentally arm a recording, you can unarm it by holding Shift and tapping Play again.
What is recorded is raw crossfader and CV movement, regardless of pathway, bank, or through. So you can record your motion and then play it back in any pathway or bank, or adjust the through to get different effects.
Recording in sync with an external clock
Recording and playing motion using external triggers is a great way to synchronize your recordings to a clock. Send a stable clock to the Trig jack and use the clock divider to set how many beats you want to record. For example, if you want your recording to be 16 beats, set the clock divider to 16. When you are ready to record, arm the recording and it will automatically start recording on the next split clock pulse. Recording will stop after another 16 clocks and playback will begin immediately. The recording will be exactly 16 beats long and will play every 16 beats, so it will play in a perfectly synchronized loop.
Parameters
morph
Morphs control how channels crossfade as they move through the pathway. Maximum morph allows smooth transitions on all channels. With minimum or no morph, the channel will jump from one value to the next as the scene is crossfaded along the pathway.
To adjust the morph, hold down the Morph button and turn the channel knob. By default the morph is at 100% and the knob is red. As you turn the knob down, the knob will turn white as the morph decreases.

range
Holding Shift and Morph/Range while turning a channel's knob changes the allowed voltage range for that channel. The first time you press Shift + Morph/Range, the knob lights change color to indicate the range for each channel. By default, it is dark blue indicating full range (-5V to +10V). The first click on a knob will graphically display the current range of the corresponding channel without making any changes. Lights are either bright or dim: each bright light represents 2.5V, and each dim light represents 1V or less. A red light indicates negative voltage and always appears to the left of center. All other colors represent positive voltages and always appear to the right of center. See the diagram below.
The color of the knob when you first press Shift + Morph/Range will match the color of the light with a positive value.

Clock divider
Hold Shift and turn the channel 6 (clock divider) knob to set the amount of clock division for the Trig jack. This is linked to the recording function.
Hold Shift while turning the knob and a light will indicate the amount of clock division. When you first click on a knob, the current value is displayed unchanged.
If only scene 1 is lit, the blue knob indicates the clock division amount (1 - 8). When Scene 1 and Scene 2 are lit, the knobs represent clock division amounts from 9 to 16. When scenes 1, 2, and 3 are lit, the knobs represent clock division amounts from 17 to 24. This pattern continues until all scene buttons are lit and the knob represents a clock division amount of 57 to 64. If you turn the knob further after this, the whole process will repeat, but the knob will turn pink and the clock division amount will count up from 65 to 128. Then the knobs turn gray for 129 to 192 and finally orange for 193 to 256.
random
Holding Shift and the Scene button while turning the Channel 8 knob (Random) will add a random value to all channels of the selected scene. The value of each channel fluctuates up or down by a random amount. Turning the knob up increases the maximum amount by which the value will change. The knob lights red and increases in brightness as it approaches its maximum value. Each click of the knob increases the range by a semitone.
All random values can be reseeded (reset). That is, you can change the random value itself. This is done by holding Fine and Shift while turning Random. This will change all random values in all scenes.
Other Features
Blind Mode
Normally, when you press a scene button, the output immediately jumps to that scene's channel values. However, if you want to set scene values without affecting the output, you can enable Blind mode. Hold down the Shift button and note that the channel 1 knob is green. This indicates that Blind mode is disabled (this is the default). Turning the channel 1 knob down one click will enable Blind mode and the knob will turn red.
In Blind mode, when you press a scene button, the values for that scene are displayed without being sent to the output. You can edit the value by holding down the scene button and turning the knob.
This is useful for workflows where you set up a scene and then transition with a crossfade. Then set up another scene and crossfade to it, etc. This workflow pairs well with Classic Bank, described in the next section.
Classic Bank
Catalyst Controller has eight regular banks, but there is a ninth bank, Classic Bank, that has special properties. This bank works like Emblematic Systems' classic Catalyst module, with two scenes always present in the pathway.
To enter Classic Bank, press and hold Bank and press Play. To check if you're in Classic Bank at any time, just press the Bank button: If the Play light is on and the Scene button is not, you're in Classic Bank. To leave the Classic Bank, change to another bank by holding Bank and pressing the Scene button as usual.
In Classic Bank, a pathway always consists of two scenes. These are referred to as A (Scene A), which is accessed when the crossfader is on the left, and B (Scene B), which is accessed when the crossfader is on the right. To replace Scene A, hold the Morph button and tap the Scene button. To replace Scene B, press and hold the Add button and tap the Scene button.
Unlike regular banks, you cannot add, delete, or insert scenes to Classic Bank pathways. This is because it consists of only two scenes (A and B).
Classic Bank is good if you want to go from one preset "sound" in a patch to another.
First, set the first scene to Scene A, the second scene to Scene B, and move the crossfader to the far left. When you're ready to transition, crossfade to the right. When you want to transition to something next, replace Scene A with the next scene and crossfade to the left. You can continue this process and select a scene to crossfade a new scene for each transition.
Blind Mode also works well if you want to edit your scene before moving to these.
Copy / Paste
You can copy data from one scene and paste it into another scene. The scene data contains 8 channel values and their random amounts. Note that if the scene uses the random feature, only the values before being randomized will be copied, and the random range values set with Shift + Scene + Random will also be copied. Once pasted, the new scene will have different random values.
Copying and pasting scenes is done by pressing the copy and scene buttons in a specific order. To copy a page, first press and hold the Scene button, then hold it and tap Copy a second time. The scene button will flash to confirm the copy.
To overwrite another scene, first press and hold copy, then tap the scene button for the scene you want to overwrite. The scene button will flash to confirm pasting. You can take as much time as you like between copying and pasting, and you can also copy/paste between banks by changing banks. Tip: If you want to paste a scene multiple times, you can hold down copy and tap multiple scene buttons in sequence.
save
To save all data (bank, scene, mode, settings), first press and hold Bank, then press and hold Morph for about 3 seconds. When the light flashes, release the button. The next time you turn it on, everything will be loaded.
clearing the scene
To clear all channel values on the scene, press and hold Shift and Play for 3 seconds. Release the button when you see all scene lights flashing. Tap the scene button to clear data for that scene. This will also clear the random amount you set for this scene.
Change to Catalyst Sequencer
Catalys Controller/Sequencer is the same module with different faceplates. The faceplate itself is double-sided, with sequencer artwork on one side and controller artwork on the other. You can change the Catalyst Controller to a Catalyst Sequencer by holding down Play + Copy + Morph (three buttons on the left). The light will flash quickly and you will be in controller mode.
To undo, press and hold the three buttons on the right: Shift + Add + Bank.
If you want the unit to always start as a sequencer, press and hold the three buttons on the left when powering it on. Similarly, you can revert the unit to booting as a controller by holding down the three buttons on the right.
Firmware update
To update the firmware, hold down Copy and Shift while powering off and then powering back on.
When you release these buttons, the Play button will flash.
Connect the audio cable from your phone or computer to the Clock In jack. Increase the volume to 100%. Play the firmware file downloaded from 4mscompany.com. The button light will flash during playback.
If the lights on the top all flash together quickly, it indicates an error. Reset your audio files from scratch, check your cable connections and volume, and press the Play button to reset. Try playing the audio file again.
Once completed, you will see a chasing animation (the lights on each button turn on one at a time). If this animation is not displayed, the update has failed.
Otherwise, please power off and power on again to use the new firmware.
Firmware version
At startup, the lights on the knobs display a color pattern and the lights on the scene buttons indicate the firmware version.
Firmware version 1.0 is represented by the first scene button being illuminated during the first half of the knob animation and extinguished during the second half of the animation.
Firmware version 1.1 has not been released yet, but is indicated by the first page button being illuminated throughout the knob animation.