Xaoc Devices Moskwa II is an 2-step sequencer that generates two types of signals: gate / trigger and CV.Designed with live sequence programming in mind, this unit has achieved significant functional expansion while maintaining the panel structure and operating principles of the original Moscow, which was inspired by the classical analog sequencer.
Custom trigger pattern that allows you to set ratchet, repeat, etc. for each step
OptionalOstankino IIFurther expand the function by connecting an expander
?
HOW TO USE
At the core of the Moskwa II is an 8-step CV sequencer and a parallel 8-step gate / trigger sequencer.These sequencers provide the CV and gate / trigger signal pairs needed to play the eight looping musical phrases found in old-school analog sequencers.These two signals can also be used individually to trigger different events in the system or to modulate any parameter that corresponds to the CV control.The built-in quantizer and through limiter allow you to change to a more musical CV signal.The sequencer's tempo can be set via an internal or external clock, making it easy to keep in sync with other modules in the system.
In addition to these basic features, Moscow II offers more unique and advanced features such as eight independent gate / trigger pattern generators that can be set for each step.Interpreted like a sequencer within a sequencer, this feature allows you to create complex gate / trigger patterns such as step repeats, additional pauses, micro-timing and swing effects.It also has two independent randomization circuits that can be used to randomize various parameters, and eight preset slots that can be called at any time, making it a longer and more complex sequence than the traditional 8-step sequencer produces. Allows the generation of.The optional Ostankino expander module includes CV control inputs to the main parameters of the Moscow II, step repeat count inputs with momentary buttons, internal clock output, independent gates per step (changeable to BIT MODE) output, Leibniz binary -By implementing a connection connector with the subsystem, a more flexible and creative sequence system environment is provided.
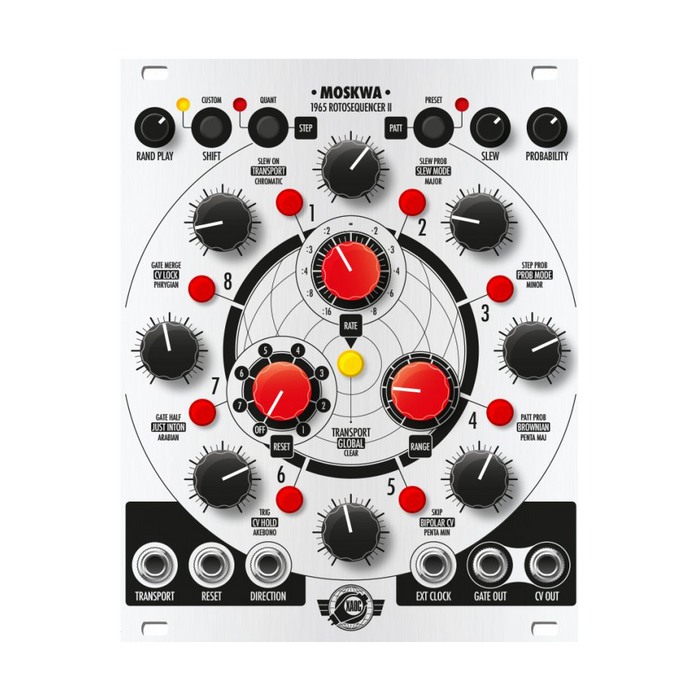
Interface
?
The explanation of each part is displayed by mouse over
MODES: STEP & PATTERN
Most adjustments / changes to gate / trigger events are performed in STEP MODE and PATTERN MODE, two major modes of operation.To select a modeSTEPor sending us a message onPATTClick (adjacent LED = yellow). STEP MODENow, use the eight STEP buttons arranged in a circle to enable / disable the gate / trigger signal for each step.To perform advanced settings for a step, press and hold the STEP button for 8 second.See STEP SETTINGS below for setting details. PATTERN MODENow each step stores a unique micro sequence that plays up to eight gates / triggers each time a step in the main sequence is triggered.This most powerful new feature of the Moscow II allows you to create ratchets / step repeats / swings / fermata and more.When the pattern is activated, the existing single gate / trigger at the specified step is replaced with a micro sequence of up to 8 gates / triggers.At this time, the backlight of each STEP button illuminates red or orange depending on the selection state of the pattern playback mode, and the steps of the sequence last for 8 to 1 clock cycles.If the specified step is invalid, the gate / trigger signal will not be generated regardless of the presence or absence of an active pattern.
QUANTIZATION
STEP / QUANTPress and hold the button for 1 second to turn the LED next to the button red and enter the Quantizer settings menu. Select 8 scales with the STEP button, and the selected scale is indicated by a green backlight.The quantize function is applied immediately to the output CV, so you can select the note value of the specified scale by operating the CV knob.For accurate verification, patch the Moskwa CV OUT to the external oscillator's 1V / Oct input and tune the oscillator to the root note of the scale of your choice.Available scales are chromatic / major / minor / major pentatonic / minor pentatonic / Akebono / Arabian / Frisian / as labeled on the panel.To exit the settings menuSTEPor sending us a message onPATTClick one of the main mode buttons.
CUSTOM SEQUENCE
This feature, which allows you to freely program the playing order of steps, is only available in STEP MODE.To create a custom sequenceSHIFT / CUSTOMHold down the button and click the STEP1-8 buttons in any playing order (up to 256 steps). Release SHIFT / CUSTOM to finish programming, the LED next to the button will turn yellow and the original playing sequence will be replaced with a custom sequence.Custom sequences can be recalled at any time with the SHIFT / CUSTOM buttons.You can also add a step at the end of a sequence by performing a programming-like operation while playing the custom sequence.Performing a step add operation when a custom sequence is disabled erases the existing custom sequence.To clear the custom sequence without replacing it with a new one, press TRANSPORT and SHIFT at the same time.
PRESETS
PATT / PRESETPress and hold the button for 1 second and the LED next to the button will turn red to access the preset memory.The memory has eight preset slots, and the written slot (STEP button) is indicated by a green backlight.Click the appropriate STEP button to select a preset, the button will blink during loading and will change from green to red after completion.The last loaded slot is also shown in red. The pattern written with the two Moskwa IIs chained together is indicated by a yellow backlight, and reading such a linked pattern changes the unit to chain mode.
To save the current module state as a new preset, access the preset memorySHIFTCorresponds to the save destination while pressing the buttonSTEPClick the button.This willExcluding CV LOCK functionAll settings are written as presets.Also, when loading presets, there may be a discrepancy between the knob settings and the actual values generated by the loaded presets.To prevent unexpected pitch changes when you touch the knob, the value changes only after passing the value written as a preset when operating the knob.To recall the current knob position, load an empty preset slot.
TRANSPORT BUTTON: SECONDARY FUNCTION
The TRANSPORT button is used to play / pause the sequence, and it is also used to restore the default settings by operating it in combination with the STEP1-8 button or the main mode button (STEP & PATT).
In STEP MODE,TRANSPORT + STEP1-8Reset all settings of the specified step by the operation ofTRANSPORT + STEPNow, set all steps in STEP MODEReset (including disabling steps).Also,TRANSPORT + SHIFT / CUSTOMErase the custom sequence with.
In PATTERN MODETRANSPORT + STEP1-8The pattern of the steps specified inTRANSPORT + PATTResets all PATTERN MODE settings with. In PRESET MENUTRANSPORT + STEP1-8Clears the preset slot specified by.Also, when STEP3 is enabled in the global settings, hold down the TRANSPORT button and raise the PROBABILITY knob to the maximum value, then set it to the minimum value to erase the PROBABILITY sequence.
STEP SETTINGS
To make detailed edits to a step, press and hold the desired STEP button for 1 second.You can also edit multiple steps at the same time by holding down and clicking another STEP button.The steps selected and edited are highlighted in green. Various functions are labeled near the STEP button, and you can select the function to edit with the button (backlight = green).
STEP1-SLEW ON: Turns the through limiter on / off for the selected step.Through time can be adjusted overall with the SLEW knob
STEP2-SLEW PROB: Switches the on / off of the probability function that inverts the state (on / off) of the through limiter.As an example, when the through limiter is enabled in the specified step, turning this function on will affect the through limiter disabling function.The reverse is also true.The degree of probability of change can be adjusted comprehensively with the PRO BABILITY knob.
STEP3-STEP PROB: Enable the gate / trigger occurrence probability function of the edit step with the button operation
STEP4-PATT PROB:Enables the probability function of pattern playback on / off of the specified step by operating the? Button.
STEP5-SKIP: Enable the skip function.Steps with skip on are excluded from the sequence and the sequence length is shortened.
STEP6-8: Select the type of signal output from GATE OUT.When both buttons are off, the output is a gate signal.The gate length is equivalent to the pulse width of the external clock signal.When operating with the internal clock, it is half the step length.STEP6When is lit, the trigger signal is output instead of the gate signal.
STEP7-GATE HALF: By enabling it, the length of the output gate signal will be changed to half the step length.
STEP8-GATE MARGE: Enables a legato-style gate output that continues for the entire step length and connects with the gate for the next step.
PATTERN EDITING
As mentioned above, each step can have its own pattern.To enable / edit a patternPATTClick the button to enter PATTERN MODE and press the STEP1-8 button to select any step.The button lights up, but I haven't heard any changes yet.Press and hold the button for 1 second to enter edit mode.You can also edit multiple steps at the same time by holding down and pressing another button.The button to be edited is indicated by a green backlight.The default pattern is 8 steps, only the first step is active.To change thisSHIFTHold down the button and use the STEP1-8 buttons to specify the final step of the pattern.The specified pattern length is indicated by a red backlight.You can now edit the pattern steps in a manner similar to the step on / off setting in the main sequence, and the active pattern steps are highlighted in yellow.To exit edit mode, click the STEP or PATT main mode button.
In PATTERN MODE, the pattern playback mode can be selected for each step.To do this, hold down the SHIFT button and press the STEP1-8 button to select any step.The red backlight indicates the basic DIV PATTERN MODE, which plays the entire pattern during a single step period of the main sequence.Therefore, each pattern step is played with a fractional length of the step length of the main sequence (depending on the number of pattern steps).The yellow backlight indicates MULT PATTERN MODE, and each pattern step is played for the length of one clock cycle.Therefore, the steps in the main sequence last for the number of steps in the specified step pattern and the number of existing clock cycles.This setting is unique for each step.
In PATTERN MODE, individual patterns are shown with dim illumination in the corresponding pattern playback mode (dim yellow = MULT PATTERN MODE, dim red = DIV PATTERN MODE). In STEP MODE, the step where the pattern is active is indicated by a dim orange backlight.The basic pattern setting is 8-step DIV PATTERN MODE, and only step 1 is active.This allows you to activate the pattern and start editing the pattern step without affecting the main sequence (the gate length of the specified step will be shorter).
GLOBAL SETTINGS
The global settings, accessed by pressing and holding the TRANSPORT button for 1 second, set additional options for advanced controls on the operation of the sequencer.Enabled functions are indicated by the yellow backlight of the corresponding STEP1-8 buttons.
STEP1-TRANSPORT: Changes the behavior of the TRANSPORT input.By default, the input gate pauses the sequence, but enabling this feature will respond to the trigger signal and switch between playing and pausing the sequence.This will be the same operation as the operation of the TRANSPORT button.
STEP2-SLEW MODE: Change the operation of the through limiter from portamento to glissando.By enabling this feature, changes in the CV value between steps will be quantized with the current quantizer settings, making them stepped over the default smooth portamento.If the quantize function itself is off, the glissando will be the same as portamento.
STEP3-PROB MODE: Changes the function of the PROBABILITY knob.When enabled, the knob does not increase the probability of random event inversion, but adjusts the degree of randomization of the self-created sequence of inversions of the settings enabled in STEP SETTINGS STEP 2, 3, 4.The sequence consists of 2 steps that change every two cycles of the main sequence. The PROBABILITY knob adjusts the probability that the STEP SETTINGS settings will be reversed.All steps have the same probability value, but the results of each step will be significantly different. When the PROBABILITY knob is at its minimum, the sequence is fixed to the latest iteration and repeats unchanged.When the knob is at its maximum value, the inversion probability of the parameter set in STEP SETTINGS is 16%.This means that every two cycles of the main sequence, the inversion of the values without random elements is done to create a 100-step sequence.In intermediate settings where the knobs are not extreme, the inversion sequence is gently morphed.To clear the sequence and restore the STEP SETTINGS settingsHold down the TRANSPORT buttonRaise the PROBABILITY knob to the maximum value and stop down to the minimum value.
STEP4-BROWNIAN: Change the function of the RANDOM PLAY knob.By default, knob operation increases the amount of randomization of the step playback order.Enabling this setting changes the knob function to Brownian motion.When the knob is at its maximum, there is a 20% chance that the step will move backward, a 20% chance that it will stay, and a 60% chance that it will advance the step.When the knob is at its minimum, there is a 100% chance that it will move the step forward.Therefore, the knob operation does not change the step playback order of the main sequence.
STEP5-BIPOLAR CV: Change the maximum output CV range from 0-8V for unipolar to ± 5V for bipolar.
STEP6-CV HOLD: Enable the CV HOLD function with the touch of a button.This ability to hold the voltage from the last effective step to the gate / trigger of the next effective step is useful, for example, when muting a step and the VCA envelope is longer than the length of one step in the main sequence. ..For example, you can prevent the pitch from changing while the envelope is operating in the decay / release stage.
STEP7-JUST INTON: Just intonation is applied instead of equal temperament with the touch of a button.
STEP8-CV LOCK: Disables control of the CV knob Enables the CV LOCK feature.This makes the output voltage from the CV OUT unaffected by the panel control, preventing unexpected pitch changes while adjusting other features.It is also useful in a performance environment as a CUE feature that allows you to create new sequences and see changes made to existing sequences before making them.In addition, this CV LOCK function is the only oneNot saved as a presetIt will be a setting.
EXPANDABILITY: CHAINING TWO UNITS
By chaining two Moskwa IIs, it is possible to create a sequence longer than 2 steps.Use the included 8-pin cable for connection.After connecting the two modules with the power of the module turned off, turn on the power again. Use the TRANSPORT button to connect / disconnect the two modules.By holding down the TRANSPORT button of the person you want to set as the main module and clicking the other TARN SPORT button, the STEP button on the main side flashes green, the STEP button on the sub side flashes red, and the connection is complete. Indicates.You can connect two units by loading a chain preset (backlight = yellow), or you can disconnect the chain by loading a normal preset (backlight = red).
Two chained Mosks generate a chained sequence, but the CV value can be changed independently for each module, with individual quantize settings and CV range settings for each CV OUT. Can be applied.The length of the sequence depends on the two RESET parameters. If the RESET setting is turned off for both units, the sequence will be 2 steps. Any changes to the RESET parameter will reduce the sequence length.For example, by setting RESET on the sub side to 2 in the above state, the number of steps will be 2.Also, chaining the two units doubles the number of custom sequences available, as each uses 16 CV values from both modules. Use the main module to adjust RANDOM PLAY and PROBABILITY settings.The same applies to the external clock input.The TRANSPORT button on the main module switches the sequence on / off, and the TARN SPORT button on the sub module switches between 4-step sequences from both modules.
EXPANDABILITY: OSTANKINO EXPANDER
The connectivity of the Moscow II can be further expanded by connecting an optional Ostankino expander. STEP with dedicated CV input for Random, Slew, Probability, Range, Rate, Transpose, FIRST / LAST STEP input for CV control of sequence start and end step selection, dedicated momentary button and gate input Provides REPEAT function.On the output side, it provides an internal clock output and eight independent gate / trigger outputs that are individual outputs for each step.Please note that the Ostankino II Expander is not compatible with the first generation Moscow.Also, chain connections between the first generation Moscow and Moscow II are not supported.