format
Stand-alone semi-modular synthesizer (voltage compatible with Eurorack) manual Japanese manual Manual pdf (English)
* As with our Urac module products, it comes with a one-year manufacturer warranty.
*Since the power on/off speed of the firmware update process is slightly severe, depending on the person, the update process may not be successful. In that case,We will update 0-COAST for free at our shop, so please contact us by email or inquiry page.(Round-trip shipping fee is borne by the customer, only for 0-Coast sold at our shop)
Make Noise is the first standalone desktop synthesizer. It is a type of synthesizer that is inspired by "East Coast" philosophy such as Moog and "West Coast" philosophy such as Buchla / Serge / Wiard, but does not belong to either of them. Since it is a semi-modular type, you can start using it without patching. A patch cable is also included.
Features
2 sets of conversion from MIDI to CV / Gate. The first MIDI A will be a MIDI note that will be converted into a pitch CV and a gate. The second MIDI B can change the output from the corresponding CV / Gate by setting.
Dual Mode MIDI Control Arpeggiator
Synchronizable to MIDI clock
Compatible with Eurorack modular CV / Gate
13 outputs, 14 input patch points
VCO is a triangle core analog
Allows unusual tone modulation using the OVERTONE and MULTIPLY controls
Reproduce the movement of the low pass gate with a transistor base
All controls are voltage controllable
With external voice input
Headphone and line compatible output
Solid steel enclosure
Compact size of W22.9cm D14cm X H1.9cm
With patch cable, MIDI cable, AC adapter for Japan
Very compact and thin size
(Korg SQ-1 and headphones are not included)
DEMO
Details
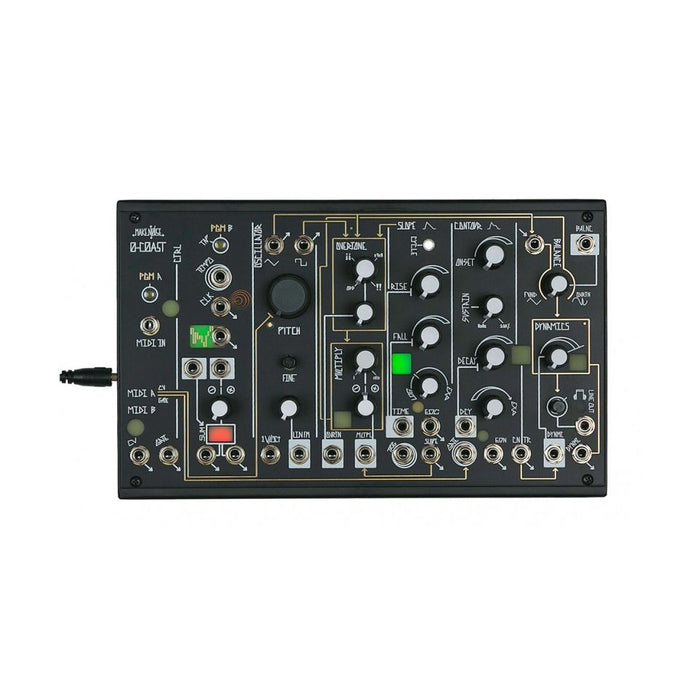
Interface
The interface of 0-Coast is roughly from the left
MIDI section
CV Utility sections such as Random and Voltage Math
Oscillator section
Overtone addition section controlled by OVERTONE / MULTIPLY
West Coast style envelope / function generator SLOPE section
East Coast style envelope CONTOUR section
Final output section for waveform mixing and volume voltage control
Has become.
The explanation of each part is displayed by mouse over
Signal Flow
Gold lines show how the signals are wired internally. As the audio flow, a triangle wave and a square wave are output from the oscillator, then pass through the Overtone and Multiply sections that add harmonics, and are transformed into complex waveforms. The complex waveform and the triangular wave are mixed according to the settings in the Balance section, and the volume is controlled by the Contour envelope (started by the gate signal or MIDI note) in the final Dynamics section, and it is sounded. The flow of these controls and signals can be modulated or altered by patching.
How to play
0-Coast uses the modular synth technique, but can be enjoyed even without a patch cable. As a basic playing method,
CV / Gate Performance: Patch the pitch CV to the oscillator 1V / Oct jack and the gate to the CONTOUR section GATE jack
Playing with MIDI sent via a stereo mini cable: A cable that converts a standard DIN MIDI cable into a stereo mini is included, so patch it to the MIDI IN jack.
Playing as a drone machine in which the sound is output when turning the knob: Patch the output of the Voltage Math section to the DYNAMICS jack of the DYNAMICS section. The Voltage Math knob becomes volume control
And so on. On top of that, twist the knobs to create a sound, but by connecting various inputs and outputs in 0-Coast with a patch cable, you can change the circuit and try a wider range of sound creation unique to modular. Is possible.
Patching and final output
The jacks with arrows show the output of various audio / CV / Gate signals. Jacks on a white background indicate CV input jacks. The double circled jack indicates the gate / trigger signal input jack. When patching inside 0-Coast,Patch the jack with the arrow and the jack on the white background or the double circled jack(Nothing happens if you patch both inputs and outputs).
The LINE OUT jack marked with the second headphone on the right and the second from the bottom is the final output, connect it with a stereo mini cable, and send it to speakers, headphones, a mixer, or an audio interface. The same sound is output from the DYNAMIC jack below that, but it is used as a mono signal suitable for use in the 2-Coast and the Eurorack modular.
Program Page Setting
The functions that can be accessed from the PGM_A and PGM_B buttons allow you to make various settings that cannot be done on the panel. Use the PGM_A button to access the "program page" for each setting item, and use the PGM_B button to set the setting item value. The basic operation is as follows.
Press and hold PGM_A buttonPress to enter the program page setting mode. At this time, the MIDI A and MIDI B LED windows will flash twice.
Press the PGM_A button, And select the program pages in order. Press repeatedly until you select the program page you want to set. There are 7 program pages in total. See below for specific settings on individual pages
herePress and hold the PGM_A buttonThis will restore the settings of the selected page to the default settings. At this time, the MIDI A and MIDI B LED windows will light up twice.
On the selected program page,Press PGM_BAnd, change the setting value corresponding to the page in order. Press repeatedly until the desired value is set.
Press and hold the PGM_B buttonThen you will exit the setting mode of the program page.
To reset all program pages to the default settings, turn on the power while simultaneously pressing the PGM_A and PGM_B buttons.
Setting items on each program page
The items and setting options that can be set on each program page are as follows. As above, press PGM_A to switch setting items, and press PGM_B to switch setting values for each item. () Shows how the button lights up when the page is selected.
1.Arpeggiator setting (PGM_A is lit): Select one of the following two modes for the arpeggiator.
PGM_B off (default): MIDI notes will be played according to the clock in the order they arrived.
PGM_B lit: MIDI notes are layered in the order in which they were played, creating an arpeggio. If a MIDI note is turned off, it will still be played, and the next time the same MIDI note is turned on, it will be deleted from the arpeggio.
2. Legato setting (PGM_A blinks slowly): Select the legato setting from the following two.
PGM_B lit (default): The gate is turned on when the first MIDI note arrives, and the gate remains on until all the notes are turned off.
PGM_B off: The gate turns on anew each time a new MIDI note arrives.
3. MIDI learn setting (MIDI_A lit): Set the MIDI channel for receiving MIDI A and MIDI B by sending MIDI data (MIDI learn). Setting separate channels for MIDI A and B is convenient for playing other synths such as the Eurorack modular with the CV / Gate converted from MIDI B.
Press PGM_B to select the MIDI you want to set. If MIDI_A is lit, set MIDI A, if MIDI_B is lit, set MIDI B, and if both are lit, set both at the same time.
Set the channel by sending the MIDI data of the channel you want to receive on MIDI A or B, or both MIDI
Press and hold the PGM_B button (the LED will blink twice) to confirm the MIDI learn settings and exit the program page settings. If you do not press and hold this, the MIDI channel setting will not actually be changed.
Also, if you press and hold the PGM_A button, both MIDI_A and MIDI_B will receive MIDI on all channels (default setting).
4.MIDI B CV settings (PGM_A lit, MIDI_B blinks slowly): Specify what is assigned to the MIDI B CV output.
PGM_B off: MIDI note number
PGM_B lit: Velocity (default)
PGM_B Slow flashing: Modulation wheel
PGM_B Blinks fast: Triangular wave LFO (independent of MIDI, tap the PGM_A button to set the cycle)
5.MIDI B Gate settings (PGM_A lit, MIDI_B flashes quickly): Set what is assigned to the Gate output of MIDI B
PGM_B off: Gate that turns on when a MIDI note arrives
PGM_B lit: Gate that turns on when the velocity is greater than 50%
PGM_B Slow flashing: Gate that turns on when the mod wheel is greater than 50% (default)
PGM_B Flashes quickly: Square LFO (independent of MIDI, the period is set by tapping the PGM_A button, so the period will be the same if the triangular wave LFO is enabled with MIDI B CV)
6. MIDI clock setting (PGM_A flashes quickly): This is a setting to reflect the MIDI clock in Tempo used for random voltage switching timing. Tempo also reflects the tap tempo of PGM_B and the clock / trigger signal to the TEMPO input jack.
PGM_B off (default): MIDI clock is not reflected in Tempo
PGM_B lit: MIDI clock is reflected in Tempo
7. Calibration (alternately flashing MIDI_A and B, PGM_A lit): Calibrates the pitch signal conversion of MIDI_A CV converter and MIDI_B CV converter. This is adjusted at the time of shipment from the factory, so it is not necessary except for trouble or special adjustment. If necessary for special adjustment, refer to the manual and calibrate. In case of trouble please contact us before calibrating.
firmware Update
The firmware update method is as follows. Update by pouring the audio file into 0-COAST.
Download and unzip the Zip file:Download the latest version of the firmware and unzip the ZIP file. Be prepared to play the wav file contained in the ZIP file from your PC or laptop at 100% volume.
Turn on 0-COAST
Connect Voltage Math to TEMPO input:Turn the Voltage Math Attenuverter on the lower left square SUM window all the way to the right. Patch the voltage math output (both two) to the TEMPO input
Keep PGM_B pressed
Power OFF → ON: While holding PGM_B, turn on the powerPretty quicklyTurns off / on. Since it is not very easy to connect and disconnect the jack lately, connect it to a power tap with a switch and turn the tap switch OFF / ON. When PGM_B, MIDI_A and MIDI_B light up, release PGM_B. Remove the patch between the Voltage MATH and TEMPO inputs
Press PGM_A: The PGM_A button lights up. This is the last step where the firmware remains in 0-COAST. Failure to follow this process will result in the loss of internal firmware, loss of related functionality, and even inability as a synthesizer. In that case, please be aware that you will not be able to return to the normal state until you redo the firmware update and succeed.
Playback equipment connection: Connect the audio output of the firmware wav file playback device to the TEMPO input of 0-COAST with a normal patch cable etc.
Press PGM_B: The firmware in memory is erased and prepared for writing
Firmware playback and update: Start playing the firmware wav file from your PC or mobile phone at a volume of 100%. Please do not play other audio including notification sounds. If other sounds are played at the same time or the volume is inappropriate, the firmware upload will fail and all 0-COAST LEDs will not light. In that case, try the firmware update process again. 0-COAST will not work properly until the update is successful. During the update, PGM_A and PGM_B blink alternately. When the update is completed successfully, the blinking of PGM_A and PGM_B will disappear and it will return to the normal 0-COAST state.
Factory reset: In order to operate aftertouch normally, perform factory reset of settings. For factory reset, power off 0-COAST once, turn on the power while pressing both PGM_A and PGM_B, and hold PGM_A / B until MIDI_A / B stops blinking.
Confirmation of successful update: If firmware 1.5.4 is installed, PGM_A, PGM_B, and MIDI A will flash when booting.