MUSICAL FEATURES
Lubadh is a full-fledged looper module for modular synths, consisting of two independent channels.The combination of the two lets you record instantly (up to 2 minutes per channel), play back, overdub, trim, scan, pitch control, delay effects and much more.Well-thought-out controls make virtual tape manipulation precise and intuitive.In addition, the behavior and sound quality of the module can be greatly changed by switching the mode by button operation and the preset function introduced from firmware V2.
Since the output of each channel is internally wired to the input of the other channel, you can easily perform recording and playback of each other's channels, feedback-like patching, and create complex loops.
- 2-channel looper
- Sound recording is done at 96kHz / 24bit and internally processed at 32bit.
- Record up to 10 minutes for each channel
- Enhanced sample management: navigate files and folders, save and recall
- Saturated analog input circuit
- LED display for easy understanding of playback speed, position, and length
- Tape speed control (Vari Speed) can be up to 4 times in both forward and reverse directions
- 1V/Oct mode
- A mode that can be synchronized to the input clock
- Link switch that can switch between stereo and dual mono
- Clock divider output
- Start position and length can be quantized in time
- AUX input / output for cross-fading between channels and voltage control
- Both recording and playback are possible with loop or one shot
- Recording mode that reflects tape playback direction and speed is also possible
- multiple playheads
- 2HP expander (included in the main unit) allows voltage control of all parameters
- The reel part is a touch plate, which affects the speed of tape playback.
1. Overview
1.1 Interfaces
Many of Lubadh's knobs and slider controls control virtual tape transport and gain, and are intuitive to use.record the soundloopYou can do a surprising number of processes by creating a loop and using the controllers to change the playback state or overdub the sound.The functions of each operator are as follows.
The explanation of each part is displayed by mouse over
1.2 Internal wiring between input and output
 A feedback path is formed between each Lubadh input and each output.on deck 1outputis deck 2'sInputon deck 2outputsignal on deck 1Inputis internally connected to the , and patching breaks this connection.This feedback path is very useful, for example, when bouncing audio from deck to deck.
1.3 Recording, overdubbing and erasing
Lubadh can record 10 minutes of audio per deck.
To record to a deck, press Deck 1'sInputconnect the audio signal to theInput Levelto the center position of the knob, andOutput Levelset to the maximum value of full right.Record buttonPress to start recording.Position / Record Indicatorflashes to indicate Lubadh is recording.Record buttonPress again to stop recording.Playback of the recorded audio begins immediately,Position / Record Indicatorto indicate that it is playing.
Erase buttonPress to erase the recording on that deck.
punch-in recordingis a destructive method of recording existing audio, completely replacing it during the period of punching in.To punch-in to any deck, press the corresponding deck'sErase buttonWhile holding downRecord buttonPressYou can also use this feature to edit existing recordings.silent breakcan also be added.
1.4 AUX IN/OUTS AND CROSSFADER
In addition to the input and output sections for the left and right decks, Lubadh provides an aux-in crossfader that allows you to route additional audio to each input section, and an aux-out crossfader that allows you to monitor the audio on each output.Each crossfader also features a CV input that also supports audio-rate voltage control.
Auxiliary Audio Input

Auxiliary Audio Output

1.5 Operation list by button combination
In addition to the basic operations and controls described above, Lubadh allows you to change various operation modes and perform file operations by button combination operations.

Below you'll find details about each mode and editing feature you can access in this way.
2. Details of modes and functions
2.1 Presets
Lubadh allows you to use user-configured presets.You can switch between two presets in the edited preset for each Lubadh deck.The selection of two available presets is done in a file named 'PresetLoader.txt' in the Preset folder of the USB drive.This Preset folder also contains some factory presets so you can start playing right away. Inside the PresetLoader.txt file, you can insert any name inside the quotes of ' "PresetA:" ' and ' "PresetB:" '.
Each preset is organized, edited and accessed via a USB drive.Edits to preset files are saved between power cycles.To restore a preset to factory settings, delete the desired file.A new copy will be created after the next power on.Note that these Preset files are simple text files (.txt), so you can edit, rename, play, and even share your favorite settings easily.
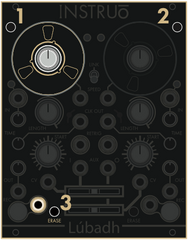
To switch between deck 1 presets, press on both decks.Retrigger/Shift Button (1&2)on deck 1 while holdingErase button (3)PressTo switch presets on Deck 2, similarly(1&2)on deck 2 while holdingErase buttonPressNow you can switch between the two active presets.

Factory preset
-
Tape Looper: One of the initial presets in V2 firmware. While following the functionality of V1 Lubadh, Vari-speed recording is incorporated,tape emulationcan be controlled at the top level.
-
Clean: One of the initial presets in V2 firmware. While following the functionality of V1 Lubadh, Vari-speed recording is incorporated,Crossfade Durationcan be controlled at the top level.This preset disables most tape emulation features.
-
Classic: This preset is set up to closely replicate the functionality of the V1, except that vari-speed recording is disabled.
-
Clockable: This preset is optimized for synchronizing loops using an external clock signal.It's a great starting point for chopping up loops or creating beat-repeat-like patches.
-
Multi-Tape: This preset uses multi-tap to achieve a multi-tap delay.
-
Sequencing Mono: This preset allows for 1V/Oct pitch change and retrigger delays, and is set to ensure that the pitch change occurs on trigger of a new note.
-
Sequencing Poly: A multi-tap version of the 'Sequencing Mono' preset above, with playback speed set to 'Hold'.This allows multiple taps to be active simultaneously, each played at a different speed or pitch, allowing for sequenced polyphonic playback of loops.
-
Melontron: A preset edited to make Lubadh look like a 'Mellotron'.It achieves 1-note polyphony by altering the pitch of looped samples using multi-tap and a 4V/octave sequence signal.
-
Octave-Delay: A preset edited to make Lubadh look like a pitch-shifting octave delay.
-
Broken Tape: This preset is a full-blown tape emulation for extreme pitch-shimmering distortion.
2.2 Multi-tap
Lubadh supports polyphonic playback.This is the ability to provide multi-tap delay functionality, like a classic analog tape looper reading a single tape loop with multiple cascading playheads.This function is ' Multi-tape '' Sequencing Poly '' Melontron '' Octave-Delay ' and curated with factory presets.
Retrigger/Shift ButtonPressing creates a new playhead tap, starting from the current position in the buffer. If four playhead taps are enabled, the oldest tap is deleted and replaced when a new tap is created.
In modes that can use multi-tap,Erase buttonWhile holding downRetrigger/Shift ButtonRemove playhead taps by pressing .You can also use the CV Expander's Erase Trigger Input to remove playback taps with an external signal.
2.3 Quantize loop start and length
Lubadh can be configured to quantize loop start positions and lengths, and only select lengths that are integer fractions of the loop size.For tempo-based loops, changing the quantized Start and Length parameters gives musical results related to the number of loop divisions.
Below are the steps to quantize Start and Length.
Retrigger/Shift Button(1)while holdingTime(2)Operate the knobs to select the start time and length quantize values for the corresponding deck.The quantize value isPosition / Record Indicatoris indicated in a manner similar to Clock Division.The number of lit sections indicates the number of loop divisions.
- No illumination of a section represents no quantization.
- Section 2 illumination sets the quantize of the Start and Length parameters to 1/2.
- Section 4 illumination sets the quantize of the Start and Length parameters to 1/4.
- Section 8 illumination sets the quantize of the Start and Length parameters to 1/8.
- continue in the same way.
- If you need adjustments without quantization when quantization is enabled,Retrigger/Shift ButtonHold to manipulate the Start and Length parameters.
2.4 Function of Time Knob
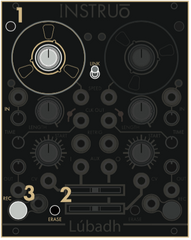
Timethe knob isTime ModesIt has three different functions calledTo switch the Time Mode of any deck sequentially,Ritrigger/Shift Button (1)on the corresponding deck while holdingRecord Button (2)PressFor example, to switch the Time Mode on Deck 1, click on Deck 1.Ritrigger/Shift Buttonon deck 1 while holdingRecord buttonPressUse the Deck 2 buttons to switch between Deck 2 modes.
Clock divisions
Time Knobscontrols the number of clock divisions per loop.You can set the number of triggers per loop from 1 to 64, and the number of triggers per loop isSpeed Indicatoris indicated.
The clock trigger signal isTime indicatoris indicated by a solid white light.
Dub Level
Sets the volume at which incoming audio is layered over existing old material when overdubbing. Since the Dub Level is the delay feedback amount, you can create a delay effect.
In this mode,Time indicatorlights amber.
User-Definable Parameters
Time Knobscontrols the amount of user-defined type parameters such as 'Crossfade Duration', 'Tape Emulation Amount' and 'Speed Slew'.
In this mode,Time indicatorflashes amber.
2.5 Input monitoring mode
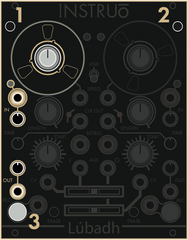
Lubadh offers 3 different input monitoring modes. To cycle through the three modes, press Deck 3 and Deck 1Retrigger/Shift Button (1 & 2)of the corresponding deck while pressingRecord button (3)Press.
For example, to toggle the input monitoring mode for deck 1Record Button on Deck 1To switch the input monitoring mode of deck 2 with a button combination usingRecord Button on Deck 2Execute button combinations using .
Input Monitoring Enabled Mode
In this mode,Record Button (1)turns whiteIlluminationTo do.Input monitoring is always enabled when this mode is selected.Any audio signal present at the corresponding input jack always flows to the output and is summed with any recorded loops.This is the default mode.
Armed Input Monitoring Mode
In this mode,Record Button (1)is whiteBlinkingTo do.When this mode is selected, input monitoring is enabled only when the deck is armed for recording or audio is being recorded.Record buttonPress onceRecord buttonblinksDark blue, and input monitoring is enabled by arming the deck for recording.again in this stateRecord buttonPress to start recording, input monitoring remains active.again to stop recordingRecord buttonPressInput monitoring is disabled and the recorded loop begins playing.in recording standbyErase buttonYou can disarm the deck without erasing the loop by pressing .
Input Monitoring Disabled Mode
In this mode,Record Button (1) TheOffbecomes.When you select this mode, input monitoring is disabled and only recorded audio is heard.outputflows to
2.6 Loop recording mode and one-shot recording mode
' Looping Record Mode 'When' One-Shot Record Mode ' of the corresponding deck to switchRetrigger/Shift Buttonwhile holdingOppositeof the deckRecord buttonPress.
For example, to switch the recording mode of deck 1, pressRetrigger/Shift Button (1)on deck 2 while holdingRecord Button (2)PressSimilarly, to switch the recording mode of deck 2, pressRetrigger/Shift Buttonon deck 1 while holdingRecord buttonPress.
- Default is ' Looping Record Mode 'is.
- ' One-Shot Record Mode ' now needs to record the loop to determine the size of the loop.Subsequent recordings will start from the current playback position and will have the size set in the first loop, andHomeとLengthwill be recorded for the time set by each parameter.Recording will stop automatically after the set time has elapsed.
One-Shot Record ModeIf you selectInput Monitoring Modewith the setting ofRecord buttonilluminates a mix of amber and white,Armed Input Monitoring Modewith the setting ofRecord buttonflashes a mix of amber and white, Input Monitoring Disabled Modewith the setting ofRecord buttonturns off.
2.7 Loop Playback Mode and One-Shot Playback Mode
' Looping Playback Mode 'When' One-Shot Playback 'To switch modes, press the target deck'sRetrigger/Shift Buttonwhile pressingOppositeof the deckErase buttonPress.
For example, to switch the playback mode of deck 1, click on deck 1.Retrigger/Shift Buttonon deck 2 while holdingErase buttonPressSimilarly, to switch the playback mode of deck 2, click on deck 2.Retrigger/Shift Buttonon deck 1 while holdingErase buttonPress.
- Default isLooping Playback Mode.
-
One-Shot Playback ModeNow we need to record the loop to determine the size of the loop.Retrigger/Shift ButtonPress or send a gate or trigger signal to the Retrigger Input toHomeとLengthPlayback of the complete loop defined by the parameters will begin.Playback will automatically stop after each loop ends.Switching between these modesLooping Playback ModeThen.Record buttonflashes white once andOne-Shot Playback ModeThen.Record buttonflashes once in a mix of amber and white.
2.8 Saving and Loading
A 'samples' folder with 12 subfolders will be automatically created on your USB drive.Each subfolder can store up to 12 loops.Loop and folder numbers are like clock division settings.Position/Record IndicatorsIt will be displayed in.The number of lit sections indicates the folder number.Loops and folders are automatically ordered alphabetically.
Save: To save loops to the USB drive, select the corresponding deck'sRetrigger/Shift ButtonとErase buttonwhile pressingRecord buttonPress.
For example, to save the loop of deck 1,Retrigger/Shift ButtonとErase buttonon deck 1 while pressingRecord buttonPressSimilarly, to save the deck 2 loop, select Deck 2'sRetrigger/Shift ButtonとErase buttonon deck 2 while pressingErase buttonPress.
Link ToggleBy saving the loop when the switch is enabled,stereo fileto save.All loops saved by these save operations will be saved in the 'saved' subfolder inside the 'samples' folder on the USB drive.This 'saved' folder will always appear in the folder menu as 'folder 0' (Position/Record Indicators unlit).Each saved file will appear in reverse order in Folder 0.In other words, the first file in the folder is always the most recent recording. If there are no samples in the 'saved' folder, 'folder 0' will not appear as an option.
To load a loop saved from one of the USB drive's 12 subfolders, select the corresponding deck'sRetrigger/shift Buttonwhile pressingErase buttonPress to enter the 'Load Menu'.
For example, to enter the 'Load Menu' of deck 1,Retrigger/Shift Button (1)While holding downErase button (2)PressSimilarly, to enter Deck 2's 'Load Menu',Retrigger/Shift ButtonWhile holding downErase buttonPressBelow are the operations in the 'Load Menu'.
- corresponding deckTime KnobsSelect a loop with
- on the opposite deckTime Knobsto select a folder
- corresponding deckRecord buttonLoad the loop selected with
-
Retrigger/Shift ButtonAudition the first 5 seconds of the loop selected with
-
Erase buttonExit the 'Load Menu' with
Link ToggleIf you load a loop while the switch is active, load a stereo file.If a stereo file is loaded into only one deck, a mono sum of both the left and right channels will be loaded.Note that audio content settings auto-saved from the previous session are automatically loaded at power-on.
2.9 Tails and tags
After recording the loop, Lubadh continues to record a 250ms "tail".By adding this 250ms tail, we can crossfade from the end of the loop to the beginning while maintaining the timing set in the original recording.When loading loops, tails can be processed in different ways by adding the following tags to the loop filename:
{s} - Silent tail (default)
- This tag preserves the timing of the loaded loop, but adds silence to the end of the loop, reducing the volume during crossfades.
- This tag is recommended for rhythmic loops where you want to keep crossfades short or don't want to use crossfades.
- It's the same process as if you didn't tag the file name.
{n} - No added tail
- This tag allows for the smoothest crossfades, but looser timing.
- Affects loop timing, as it consumes 250ms of the end of the sample for the crossfade.
- This tag is useful for long ambient or long ambiences of musical events, such as when timing is not critical and a smoother transition is desired, or when a loop is prepared by adding 250ms of audio in advance for a crossfade. Recommended for tone materials.
{c} - Copy tail
- The timing of loaded loops is preserved, but there is no reduction in volume during crossfades.Clicks may occur at transitions, depending on loop edit points and waveform zero crossings.
- This tag automatically copies the first 250ms to the end for use in crossfades.
- This tag is recommended for rhythmic loops, but transitions may be heard in longer musical events.
2. 10 mode reset
Performing a factory reset restores all modes to their default settings below.
- Input monitoring enabled
- loop recording
- loop playback
- clock division
To perform a factory reset,Retrigger ButtonWhile holding downRecord Buttons on both decksPressof both decksSpeed Indicatorflashes to indicate a successful factory reset.This operation does not erase the audio recorded in the buffer.
2 Firmware Update
The firmware update procedure is as follows.
-
please use this form.Download the latest firmware from
- open source software to burn .iso and .img files,'balena Etcher'download and install.
- Connect the micro SD card to your computer.
- Launch balenaEtcher and select the firmware zip file (compressed image file) from "Select image"
- Press Flash!
- When you're done, remove the SD card, put it back into the module with the power off, and power it on without patch cables.
- Module loads new firmware


 Below you'll find details about each mode and editing feature you can access in this way.


