Format: Eurorack
Width: 21HP
Depth: 38mm
Current: 300mA @ + 12V, 35mA @ -12V Manual (English)
The latest firmware isplease use this form.Download from Latest Firmware
The main product description corresponds to firmware version 148.The contents of improvement after that are as follows
-Change output destination: You can change the individual output destination from +'Quality'. (After 165)
-24-bit sample is now playable (downsampled to 16-bit)
-The resonance of the filter when resonance = 0 has been reduced.
・ ExpanderAxon-1, Axon-2Compatible with
MUSICAL FEATURES
Squid Slample is a sampler that supports 8-channel audio and CV playback. Designed for easy real-time sampling and editing. Inspired by early hardware samplers, it has an easy-to-use and intuitive interface using an encoder. FurtherCV sampling capability, numerous CV controllable parameters, save and recall via USBAnd so on, the essence of modern modularity has been added.Also of the expanderAxon-1You can add four assignable CV inputs by adding.
The included USB stick comes preloaded with carefully selected 90 banks of samples, from classic drum machine sounds to quirky synth sounds to field recordings. Samples by artists such as Mumdance, Solid Blake, Russell Haswell, Lauren Flax, Dave Burraston (NYZ), Sue Zuki, Dungeon Acid, Sasha Lewis, Andrew Duff are also included.
Equipped with 8 independent channels, 4 DC coupling outputs, and 1 mixed AC coupling output
The input jack for sampling can sample both CV and audio,Line levelSampling is also possible.
Each channelAbout 11 secondsCan be loaded up to the sample.Stored in mono, 16-bit, 44.1khz, low latency memory
Each channel has the following parameters and can be adjusted in real time; bit depth, sampling rate, playback speed (pitch), volume (with simple envelope), loop with crossfade, playback direction, start, endpoint, Multiple queue groups
Resonant that can be selected from high-pass, low-pass, band-pass, and notch for each channelMultimode filterIs installed
Has 3 assignable CV inputs for any of multiple parametersCan be assignedis. Channels 6,7,8, 1 and XNUMX also have a dedicated XNUMXv / oct input for pitch control
Sampling initialization and sampling channel selection can also be automated by patching.
Samples can be saved to a USB stick in normal Wav format, 8 banks can be switched immediately (1 banks can be stored per USB stick)
How to Use
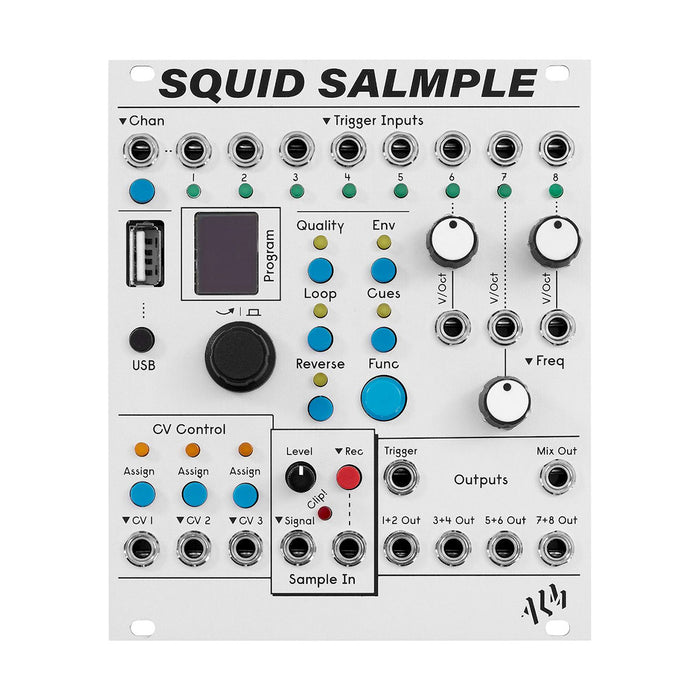
Squid Salmple uses buttons and encoders to set sample playback for each of the eight channels.Comfortable operation is possible with the buttons and functions laid out with the workflow in mind.
Interface
The explanation of each part is displayed by mouse over
Channel Selection
The channel to be set can be selected by repeating the upper left channel button in the order of 1 → 2 → 3 → ....You can also select a channel faster by pressing the channel button once and then turning the encoder.The selected channel is a button or encoderNot only will it be the target for sample playback settings, but it will also be the channel for saving samples when sampling on the main unit.Pressing the encoder on the channel selection screen will trigger a sample for that channel.You can also push the channel button with a trigger, which is useful for automating sampling.
Channel Edit
Select the sample playback setting parameters by pressing each small button in the center light blue.QualityNow, set the sample rate, bit depth, pitch, and the filter to be applied to each sample.ApproxThen, in addition to the attack and release of the envelope, the envelope corresponding to the volumeAlso set the height.ReversePress to play the sample in the opposite direction.
Parameters for quality
bits: Adjust the bit depth of the sample.
Rate: Adjust the sample rate in kHz.
Speed: Controls the playback speed (CH1 to 5 only).
Quant: Basic quantize control of playback speed (CH6, 7, 8 only).
OFF: No quantize
12: Quantize to 12 chromatic scales
OT: Quantize in octaves to easily match the original sample speed
Filter: Enables the resonant multimode filter for each channel.
OFF: No filter applied
LP: Low pass filter
BP: Bandpass filter
NT: Notch filter
HP: Highpass filter
Frequency: Adjust the cutoff frequency of the filter.It is displayed only when the filter type is selected.During adjustment with encoderFuncYou can adjust the resonance without leaving this page by holding down the button.
Resonance: Adjusts the resonance peak of the filter. It is displayed only when the filter type is selected.During adjustment with encoderFuncYou can adjust the cutoff without leaving this page by holding down the button.
Cue and Cue Sets
What is Cue
In Squid Salmple, the sample in one channel is one file,Cue pointsBy adding, you can set multiple playback positions on the file and easily switch between them. With the Cue button, you can set the start, end, and loop start positions of one Cue point while looking at the waveform.With or without loops and loop playback optionsLoop buttonAccess from.
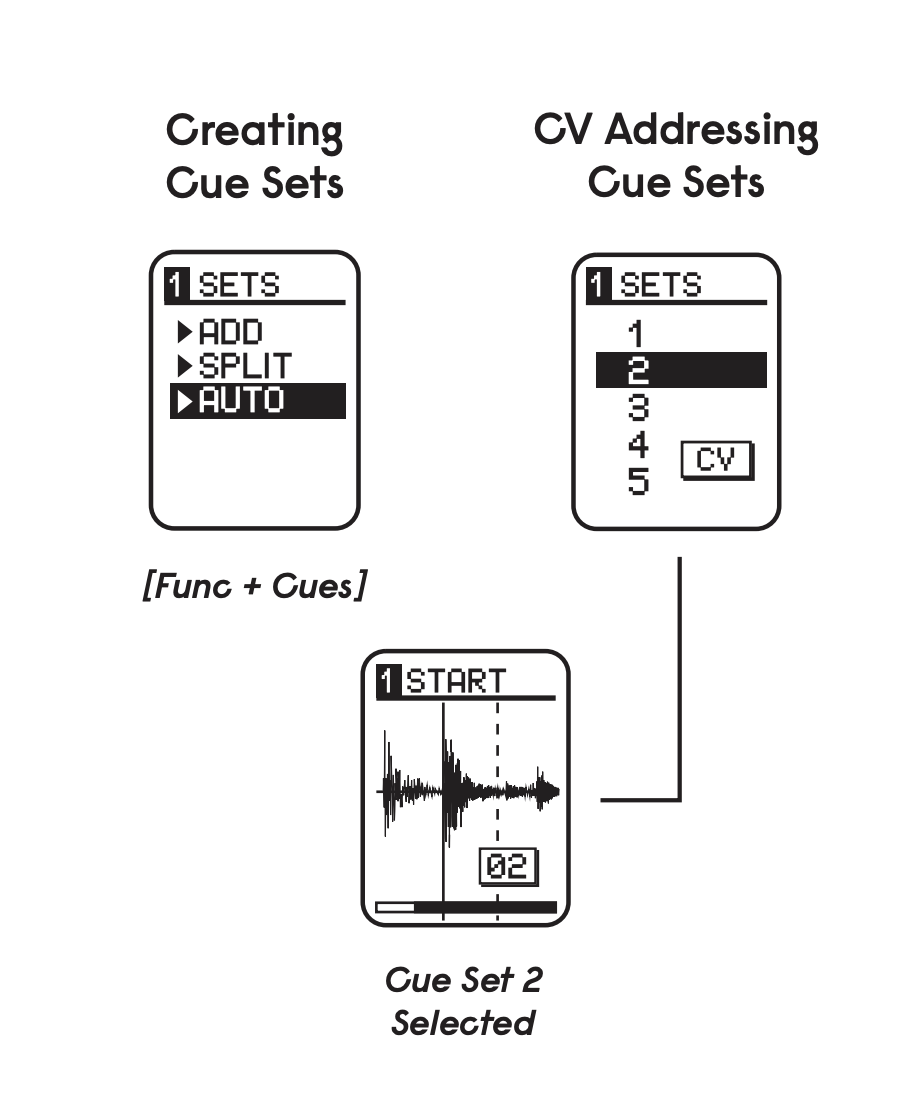
You can have multiple Cue (start, end, looppoint) for the same sample, and add or select Cue from the Cue Sets menu. Hold down Func and press CueCue SetsPlease display the screen. Cue can be added directly on Squid Salmple itself, or it can be run through popular audio editor software on your computer.Samples like drum breaksSlice automaticallyIt is also possible to allocate to Cue points.In addition, Cue can be switched with CV, trigger, and direct control.
Add / Remove Cue and Select
The Cue Sets screen displays menus that allow you to add Cue Sets in a variety of ways.If Cue Sets already exist, their list will be displayed as well.To add a new Cue Set, hover over'ADD'and click on the encoder.You can then scroll up the menu to select a new set and press the Cues button to return to the main Cues screen where you can set the start, loop, and end points for the new set.To remove unwanted Cue Sets, hover over the set you want, hold down the Func button, and click the encoder.
To activate any Cue Set, simply hover over the desired number.If the sample is playing or recording, it will be in playback standby until the next trigger.When a new Cue Set is selected, two selection options, RANDOM and STEP, are also created. RANDOM randomly selects a set each time a channel is triggered, and STEP selects a set of lists in sequence (first if last in the list).
With two options, SPLIT and AUTO, you can create even smarter Cue Sets.SPLITCuts the entire set evenly in half to quickly trim the loop into synchronized chopped pieces.CARBy detecting the attack and zero intersection of the original sampleAutomatically create slices as Cue SetThis function is effective for sample materials with clear transients.Please note that this feature will remove all existing cue. If Cue is not detected during AUTO, check the waveform as it may be interfering with zero intersection detection due to DC offset or high noise floor.RM ALLThe option removes all Cue Sets.It cannot be canceled.
Tip: WAV files containing markers are automatically converted to Cue Sets when loaded.For editing such as creating or adding markersOcean Audio Applications like (Free for Mac & PC) are available.
Sampling
To sample on the main unit, press the Rec button to enter the recording ready state (arm), and then press the Rec button again to start recording.You can also use the trigger from the Trigger output at the start of recording to trigger the sound you want to sample.Also, add a newly recorded sample behind an existing fileLinkOr make sounds to existing filesOverlapping recording(Sound on Sound) is also possible.
The new sample will be recorded on the selected channel.The maximum sample time is about 11 seconds for each channel, and the quality is fixed at 16bit / 44.1kHz monaural.As mentioned above, not only audio but also CV can be sampled, but it is not realistic to record with a strict V / Oct scale because it is via an attenuator.
The recording destination channel can be selected with the Chan button as usual, and it can also be controlled with the input trigger signal to Chan In, and the active channel is sequentially selected by the trigger.To fix the recording destination channel, hold down the Chan button and click the Rec button.By clicking repeatedly, you can select fixing or releasing, and the status will be displayed on the screen.
In addition to the basic'Replace'mode, Squid Salmple offers two recording modes,'Overdub' and'Extend'.You can switch and select the recording mode by turning the encoder on the sampling main screen.
OverdubsIn mode, the recording is superimposed on the existing sample data at a level reduced by -3dB (50%). Overdub, unlike Replace, does not erase Cue Sets, but sets the first set as the start and end points of the newly dubbed recording.
ExtendIn mode, connect the recorded audio to the end point of the sample of the selected channel and make it a new addition pointAdd Cue automaticallyTo do. If the recordable time in Extend mode reaches the maximum recording time of the sample buffer, it will not be recorded and'Full'will be displayed on the screen.To remove the extension, edit the associated outer Cue Set, or hold down the Rec button and click the encoder on the main screen.By adding short one-shot samples with Extend, many one-shots can be automatically assigned to cue and used on one channel.
CV Control
Squid Salmple has 3Assignable CV inputAnd for CH6-81V / Oct inputIs equipped with. One CVMultiple parametersIt is possible to set and assign different attenuation amounts internally.
To assign a CV to any parameter, display the desired parameter screen and click the CV Assign button.At this time, by holding down the Func button and clicking the corresponding CV Assign button, you can digitally adjust the attenuation and offset for this assignment.To assign / cancel CV to the Reverse parameter, hold down the Reverse button and click any Assign button.
Key Combos
In the parameter screen,ChanHold down the buttonTurn the encoderThis will switch to the same parameter screen for other channels.
In the parameter screen,ChanWith a buttonFuncHold down the buttonTurn the encoderThis will apply the selected parameter (same value) to all channels.
To swap the two channelsChanHold down the buttonTurn the encoderDisplay the desired channel andFuncPress the button to confirm.
To see another sample in the bank while viewing a channelChanHold down the buttonTurn the encoder..The referenced channel is displayed to the right of the channel number.
To set a "chalk" for a channelChanWith a buttonApproxWhile holding down the buttonencoderSelect the channel to pair with.On the screenC <number>Is displayed, indicating that the choke is valid.
To output a trigger from Trigger Out without enabling samplingFuncHold down the buttonClick on encoderTo do.
FuncHold down the buttonRecBy pressing the button, you can listen to the input signal to Signal In sent to Output 8 / turn the monitor on / off.
Func + EnvMute the channel withChan + Func + EnvQuickly solo the channel with.
To access Cue SetsFuncHold down the buttoncuesClick the button.FuncHold down the buttonClick on encoderThenCueTo delete.
ChanHold down the buttonRecClick the button to lock the recording destination channel.
To erase a sample recorded with Extended, go to the recording screenRecHold down the buttonClick on encoderTo do.
firmware Update
A firmware file named alm022-fw.bin from ALM BusyサイトDownload from "Latest Firmware".Place the file on the top of the USB memory, insert it back into the module, and turn on the module while pressing the Func button.The update will start automatically and when complete it will reboot and work with the new firmware.
Demos
This is a video explaining our Squid Salmple at the Meeting of Modular.