Control Forge is a powerful 8-segment control voltage generator optimized for modular synthesizers that makes it easy to edit the function generator that was also installed in E-mu Morpheus. You can create one-shot envelopes, circulating patterns, and even long and complex sequences.
Basically, a voltage value (level) and the time it takes to reach that levelFunction generator that can be set for every 8 segmentsWorks as
It is a simple operation to select the parameter to be selected with the button and set the value with the encoder or knob. All button operations are one push only, there is no need to select a menu (except preset save etc.)
The level of each segment can be set relative to the level at the end of the previous segment, or can be set as an absolute value
The level of each segment follows a linear or Gaussian distributionrandomYou can also have a
The time scale can be adjusted by manual control using a CV or encoder.
The voltage curve for the transition between segments is67 different shapesYou can choose from. There are common linear, exponential, random, chaotic, and other forms that can not be said in a word (for example, output the input CV as it is only for a specific segment)
By choosing "DC" as the transition curve, Control Forge retains its programming capabilitiessequencerCan be used as By using it in combination with the preset sequencer, you can create a sequence of hundreds of steps and control it in real time.
Each segment is a different segmentConditions for jumpingIt is also possible to put on. For example, you can add a richer variation to the function by external control by making it jump to a specific segment only when a certain CV input is over a certain value.
Control ForgeAuto chainFeatures make it easy to pattern with multiple presets (separate from the preset sequencer)
The two trigger outputs can be programmed to trigger on various events, which can be patched to Control Forge itself or other modules.
Recall and save 500 presets
Preset sequencerAllows you to sequence up to 200 preset user-configured triggers, clocks, or manually.
All presets and sequencesSatelliteYou can freely send it to the module (Release date undetermined), then the Satellite can be run as a standalone modulation source independent of Control Forge.
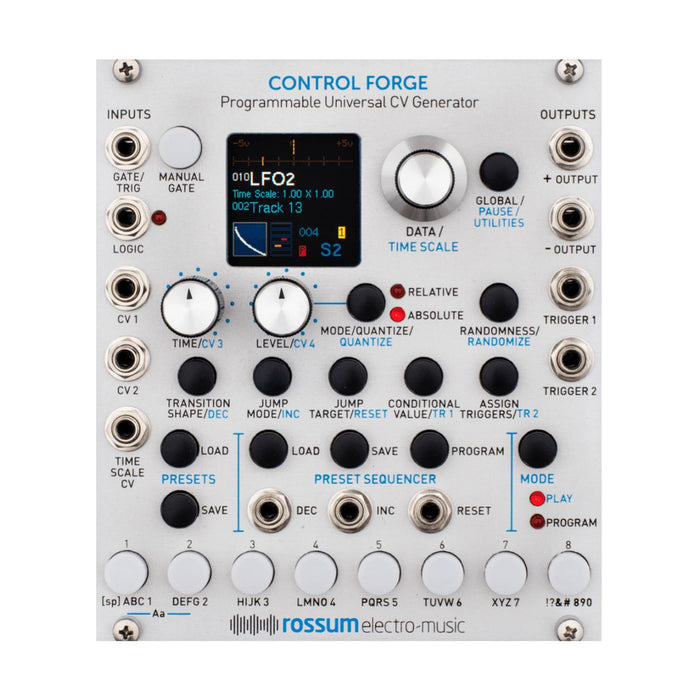
Interface
The explanation of each part is displayed by mouse over
DEMO
How to Use
Control ForgePlay modeとProgram modeIt can be operated in two modes, which can be switched with the MODE button at the bottom right. The subscripts for each button indicate the function in play mode in blue and the function in program mode in black.
Play mode
In play mode, knobs and buttons can be used for real-time control of functions. You can manually control the level randomization, time scale changes, and various trigger events with buttons.
Utility menu The utility menu is a menu packed with functions required for maintenance of Control Forge. Access by pressing and holding the Global / Pause / Utilities button while in play mode.
Send to Module: Send all presets and sequences to Satellite or other Control Forge. The transmission method is as follows
Patch the source module's Trigger 2 to the destination module's Logic input
Use the Utility menu to select Send to Module for the sender and Receive From Module for the receiver.
Press the encoder on the sender Control Forge. Display shows progress
If it fails, an error message will be displayed, so press the encoder to try again or press the Global / Pause / Utilities button to exit the mode.
Receive from Module: Select to receive presets or preset sequence data from other Control Forge modules. See above for data transfer process
Save User Data: Outputs presets and preset sequence data as backup. Here's how
Connect the + output of Control Forge to your recording equipment. Record with high resolution Wav data, not MP3
Select Save User Data from the utility menu
When selected, Control Forge will output a test sound. Set your recording equipment so that this level is -6 dBFS
Start recording
Press the encoder to start playing the data sound
When the transfer is over, stop recording and save the recorded wav file as a backup
Verify User Data: Check if the backup file created above is correct data. It does not actually load the presets etc. in the backup file into Control Forge
Patch the output of the backed up wav file from the playback device to Control Forge CV1.
Select Verify User Data and press the encoder.
Start playing the wav file
Displayed on screen when an error occurs
If no error is found, the wav file is valid as a backup
Merge User DataWrite the preset or preset sequence in the wav file only to the empty preset or preset sequence slot in: Control Forge. The transfer method is the same as the above Verify User Data except that Merge User Data is selected, and the wav file is poured into the CV1 input.
Load User DataLoad presets and preset sequence data saved as: Wav files into Control Forge. Please note that this operation will destroy presets and preset sequence data in Control Forge (please back up if necessary). The transfer method is the same as the Verify User Data above except that Load User Data is selected, and the wav file is poured into the CV1 input.
Calibrate: Calibrate the module. The module is properly calibrated at the time of shipment from the factory, so please try it only if you feel strange with 1V / oct quantizing (you need a tester that can measure the voltage correctly). If you have any questions about the method, please contact us
Load Software: Used for updating the main software of Control Forge. The process is performed by pouring the wav file of the main software into the CV1 input like the Verify User Data above.
Load boot software: Used for updating the software for starting Control Forge. The procedure is the same as the main software update
Manufacturing Test: Do a test to see if Control Forge is working properly
Erase All User Data: Erases all presets and preset sequence data. Be sure to check the backup status before execution.
Program mode
In program mode, each function can be finely edited for each segment. Press the button of the segment you want to edit to select the segment. The most important parameters, segment dwell time and target level, can be set with independent knobs (when set with these two knobs, the encoder can be used as a fine tune knob for that parameter). Other parameters are selected by pressing the button, and the basic operation is to set and determine values by rotating and pushing the encoder.
The parameters to be edited can be not only the shape of the voltage curve for each segment, but also settings for jumping to distant segments if certain conditions are met, and the assignment of two trigger outputs. For conditional jumps, in addition to CV2 and CV1, you can also use CV2 and CV3 controlled by knobs, as well as logic inputs.
Conditional jump settings Conditional jumps are one of the most powerful features of Control Forge. This allows you to program functions that change their behavior in response to signals from other modules.
Conditional jump allows you to set conditions for jumping to other segments for each segment. For example, if the value of a certain CV input is larger than the set value, or the state of the gate of the Logic input, you can set the jump condition. You can specify a completely different preset for the jump destination in addition to the segment. The jump destination is called the target.
To jump, press the JUMP MODE button, rotate the encoder to select, and push to confirm. The conditions for jumping are as follows.
Never: Always jump to the next segment without jumping
Always at End: Always jump to the target at the end of the segment. When the target is set to segment 1, it becomes an LFO that cycles from the segment set to 1 to Always at End.
on Gate Rise (Fall): Jumps to the target as soon as the gate enters the Gate / Trig input (when finished)
wait4GateRise: Jumps to the target as soon as a gate is entered at the Gate / Trig input. If you reach the end of a segment without a gate being input, the function will stop while maintaining the level of that segment until a gate is input.
if @ end GateHi (Lo): Jump to target if Gate / Trig input is high (low) at end of segment
on Rogic Rise ~ if @ end LogicLo: Same as above, but Gate / Trig input is changed to Logic input
when CV # (1-4)> (<): Jumps to the target as soon as the voltage to a certain CV input becomes larger (smaller) than the value set in CONDITIONAL VALUE
if @ end CV # (1-4)> (<) : Jumps to the target when the voltage to the CV input that is the end of the segment is larger (smaller) than the value set in CONDITIONAL VALUE
The jump target can be selected from the following.
to Segment # (1-8): Specifies the segment of the current preset
to Stopped: Stop preset
to Seq (Dec / Inc / Reset): Send DEC / Inc / Reset trigger to preset sequencer
to Preset ###: Jump to the selected preset
Curve shape setting The curve shape program for the currently active segment is accessed by pressing the TRANSITION SHAPE button. You can select from 67 types of curve shapes, many of which correspond to various shapes, and the outline of the graph is displayed on the display. The complete list of shapes ismanualIt is posted at the end of.
Some options have special meaning.
Delay DC and DC Delay: These indicate the state of constant voltage value. DCdelay will reach and maintain the target level as soon as it arrives at the segment. DelayDC keeps the target level of the previous segment in the current segment and transitions to the target level at the end of the segment.
ZigZag1 / 2/3: It is a shape that reciprocates two types of curves point by point.
CV (1-4) Passthrough: If you select this, the function while you are in the segment outputs the value of the CV1 / 2 input or CV3 / 4 knob as is. This option gives Control Forge unprecedented possibilities. It is also a powerful function when you run Control Forge at the audio rate.
Trigger event settings To set the event that triggers output, press the ASSIGN TRIGGERS button. By pressing repeatedly, you can also set the trigger pulse width and TR2. Assignable trigger events are
off: Do not output any trigger
Gate Rise (Fall): Triggered when the gate is ON (OFF) (via input jack or manual button)
Logic Rise (Fall): Similar to the gate
on-stop: Trigger when the function stops
Begin (end) Any Segment: Trigger at the beginning (end) of all segments
Any Jump: Trigger on the moment all jumps occur
Begin (End) Segment #: Trigger at the beginning (end) of a specific segment
Jump From Segment #: Trigger when jumping from a specific segment
Preset Global Menu The preset global menu is a preset-wide setting that is stored for each preset, regardless of segment. Access by pressing the GLOBAL button in program mode. The setting items are as follows.
Gate Rise: Gate / Trig This is the setting for what happens when a gate is input. If Auto Chain is not ON, select Off or Start / Reset. If you want to use it as a gate input to raise a normal envelope, of course, select Start / Reset. There are also sub items such as Start Level / Reset Level / Reset Random Level / Reset Random Shape that set the level at the start point.
Gate Fall Jump: Set the action when the gate to Gate / Trig goes low. You can select Off or Segment # (1-8), and the selected segment corresponds to the release segment of normal ADSR.
free Run: When ON, without gate input etc., select preset and run at the same time, loop up to segment 8
Randomize Level: Set randomize range in play mode
Randomize Shape: Set randomize distribution in play mode
Scale All Times: Reset the time scale. This is useful when creating a version with the entire time adjusted again (reflecting this setting makes the time of each segment an actual changed preset)
Presets & Preset Sequences
Control Forge has powerful preset and preset sequence features. Use the LOAD / SAVE button in the lower left to access the preset storage and recall, and the LOAD / SAVE / PROGRAM button in the lower center to access the preset sequence function.
The preset sequence can be edited by accessing it from the PROGRAM button. By pressing a button, turning the encoder to the step you want to set, pressing the encoder, and then turning the encoder you can select the preset or non-preset navigation command or action you want to include in that step.
Navigation options
Pause: Pause the preset sequencer
Halt: Reset and stop the preset sequencer until it returns to step 1.
Bumper: Don't come to that step
Action options are
Insert Step: Insert a new step. New steps have Pause navigation and can be changed immediately
Delete Step: Delete the step and return to the program sequence screen
Bumper: Don't come to that step
.
Comments will be added about the auto chain function