Format: Eurorack
Width: 20HP
Depth: 25mm
Current: 188mA @ + 12V, 48mA @ -12V Japanese manual(Firmware v4) Manual pdf (English) (firmware version 5)
MUSICAL FEATURES
* The following description corresponds to the latest firmware version 5. For DLDs purchased before July 2016, you can update the firmware according to the method in the "FIRMWARE UPDATE" section. Japanese manual for firmware v7please use this form..
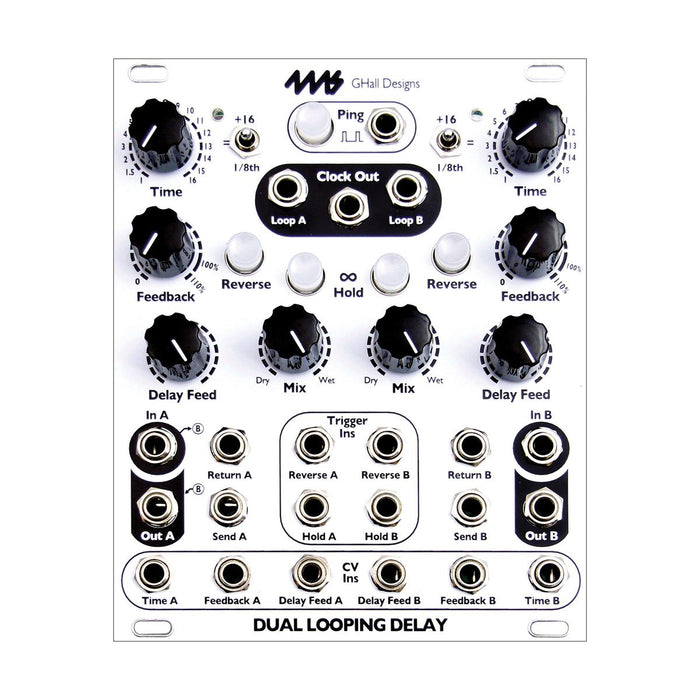
The 4ms Dual Looping Delay is an advanced audio processor for creative synthesis, and is a module jointly developed by Gary Hall, the creator of Lexicon PCM42, and 4ms. It has the characteristics and features of extremely clear sound quality, delay, looping, and synchronization of sample precision, because it dynamically captures and processes audio, rather than tape or analog emulation.
Looping delays, such as those found in the Lexicon PCM42, developed in the late 70's and 80's and had long-term audio memory and looping capabilities, but they couldn't trigger recording or playback. By default, the looping delay will continuously record and play, but you can stop the recording at any time with the HOLD button and loop the previous recording indefinitely. The TIME knob controls the delay time when not held, but controls the loop length when held. The clock input allows you to control the sound being looped using a gate sequencer.
Has two independent delay / loop channels and can be synchronized on a common time base
In the default 16-bit mode, audio (3 minutes, 2 seconds) can be stored in each channel for nearly 54 minutes (24 minutes, 1 minute 27 seconds)
48kHz / 16-bit sampling rate, optional 24-bit recording possible
Very clean sound with low noise and low jitter
Internal connection of input / output convenient for use in mono / stereo / dual
The base clock can be set by tap tempo or clock input
The delay loop time can be set by a multiple of the clock or by a whole number (also possible to set asynchronously). Supports switching with CV and switch
Clock output with sample accuracy allows perfect synchronization
Clock output synchronized with the loop for each channel
By using the switch together, the delay time range can be set from 1/8 beat (clock) to 32 beats.
Digital feedback up to 110%
Delay level can be controlled by DELAY FEED separately from Dry / Wet
Infinite hold mode disables recording input and loops 100%
Reverse mode plays the contents of the memory in reverse
External clock input can be synchronized up to audio range (2kHz), and delay time can be set up to 16kHz
In asynchronous mode, the Time CV jack controls the delay time with 1V / Oct, so you can use it as a sound source by Karplus-Strong synthesis by increasing the feedback and inputting noise bursts and triggers.
When the loop is held, the playback position and loop length can be controlled with the knob or CV
Hold or reverse state can be switched by trigger or gate input
Send / Return jack can be used to provide feedback externally
CV control of delay time, level and feedback
Firmware can be updated by inputting audio
Equipped with system setting mode to change and store settings
Ping clock can be locked for each channel, so you can operate each channel with different base clock.
You can clear the memory contents for each channel by pressing and holding reverse and hold at the same time.
CONTROL
HOW TO USE
The operation of DLD differs greatly when operating as a high-performance delay and when operating as a looper with the HOLD button ON.
DELAY (HOLD = OFF)
When the HOLD button is OFF, that channel operates as a delay. By patching the input and output of each channel, you can use each channel as an independent delay. When it is not patched to IN B, the signal to IN A is also input to IN B by internal connection, and when it is not patched to OUT B, the output of CHANNEL B delay (OUT B) is mixed with OUT A. Will be output. Therefore, it also functions as a stereo delay for mono / stereo input, or as a complex rhythmic delay that mixes two delays.
The delay time can be set in synchronization with the clock input to the PING jack or the time that is 1/8 to 32 times the clock that operates at the time when the PING button is tapped. The delay time is set with the combination of the TIME knob and switch.
When the switch is down (1/8): The TIME knob can set the delay time from 1/8 to 16/8 times the PING clock
When the switch is in the middle (=): The TIME knob can set the delay time from 1 to 16 times the PING clock
When the switch is up (+16): The TIME knob can set the delay time from 17 times to 32 times the PING clock.
You can also use patching and CV control to create very complex rhythmic delays.
Another feature is that by inputting a trigger to the REVERSE button or REVERSE jack, the delay will play in the opposite direction. Also, since the DLD has an audio buffer with a very long time, depending on how the delay time is moved, the audio input a long time ago may unintentionally appear as a delay signal. In such a case, hold down REVERSE and HOLD to clear the audio signal recorded in the buffer.
Asynchronous mode The above operation is the operation of DLD's basic synchronization (quantize) mode. However, by holding down the HOLD button and turning the TIME knob, the delay becomes asynchronous (unquantized) mode, and it is possible to continuously set the delay time to a time other than a multiple (or an integer) of the clock. I will. The function of the TIME CV jack is changed in asynchronous mode. The TIME CV jack now controls the delay time on a frequency basis of 1V / Oct. In synchronous mode, a high voltage puts a long delay time, but in asynchronous mode, a high voltage puts a high frequency, that is, a short delay time. When the CV input responds at 1V / Oct, the PING clock is set to the audio rate to increase the feedback, and noise bursts or short triggers are input to the delay to become a sound source, and its pitch can be controlled with TIME CV. It becomes (Karplus-Strong synthesis). If you want to control the delay time with a strict 1V / Oct response, set the switch to the middle or lower position.
If you turn the TIME knob without pressing the Hold button, the channel will revert to normal sync mode. The basic roles of knobs, jacks, and buttons other than TIME CV and TIME knob are the same in synchronous mode and asynchronous mode.
LOOPER (HOLD = ON)
When the HOLD button is ON, that channel operates as a looper that loops the previously recorded audio. At this time, the signal input to the delay is no longer recorded in the audio buffer, and only the recorded sound is looped. The point on the buffer that the DLD called as the delay output when the HOLD was turned on (WET) is the start point of the loop, and the point that the DLD was recording (DRY) is the end point of the loop. . Therefore, the loop length is the same as the delay time set by the TIME knob / CV, and the TIME knob / CV controls the loop length during the hold mode.
In hold mode, the FEEDBACK knob does not work just by turning it. However, you can control the playback position of the loop by holding down the HOLD button and turning it. While holding down the HOLD button, move the FEEDBACK knob from 0% to 100% to scroll the playback position by the length of one loop. The FEEDBACK knob is disabled unless you press the HOLD button.
Set to 100% FEEDBACK without pressing HOLD
Hold down HOLD and move to FEEDBACK 0%
Release HOLD
By repeating the above operation, you can move the position of the loop in the buffer.
In addition, before performing CV control of the loop position with the FEEDBACK CV input, it is necessary to move the FEEDBACK knob even while holding down the HOLD button. If you move the FEEDBACK knob without pressing HOLD, the loop position CV control will be invalidated at that moment. If the loop time is very short and the loop position is controlled by CV, an effect similar to the granular effect can be obtained.
FIRMWARE UPDATE
Firmware version confirmation method The latest firmware for August 2016 is version 8. The firmware version of DLD sold in our shop before July is 5 or less. To check the firmware version, power on the DLD, put the two switches in the upper position (+7), then press all five buttons for a few seconds. You can see the version by the button that lights up.
Firmware update method * If the firmware version is 3 or below, it may not be able to enter the firmware update standby state depending on the power supply used. In that case, if you perform step 4 within a few seconds after turning off the power, it will enter the standby state. If you try it several times and it doesn't work, please contact us so we can update it.
DLD updates the firmware by pouring the audio file. Use a PC or smartphone as the playback device (hereafter called the device). Playback conditions may be severe on PCs, etc., so we recommend playing back at full volume from your smartphone.
2. Turn off the power of DLD and connect the audio output of the device to Input B of DLD with a patch cable. You can also use a stereo cable. You can monitor the audio that is input from Output B, but it is a very noisy sound, so lower the volume and monitor.
3. Set the volume of the device and playback software to 100%. Do not make other sounds such as notification sounds and ring tones.
4. Turn on the DLD while holding down the Ping button and both Reverse buttons, a total of three buttons. Make sure the Hold A button is blinking and the DLD is in firmware update standby, then release the three buttons.
5. Start playing the file. If the Loop LED of Channel A or Channel B is blinking, the update process is in progress. At this time, be careful not to make any sound other than the firmware file. You can monitor and check the sound input from Output B as described above.
6. If the audio stops or the LED stops blinking before the file playback is complete, the update process has failed. Pressing Reverse A will cause Hold A to flash again and reset to the firmware update wait state. Play the audio from the beginning and try the update again. Before playing it again, please check if the downloaded audio file is complete or if there is no other sound.
7. If the update is successful, the DLD will return to normal operating mode.
Factory reset A factory reset may be required after updating the firmware. The factory reset procedure is as follows.
1. Unplug all cables from the DLD and power down
2. Set the Time A switch to the down (1/8) and Time B switch to the up (+16) position.
3. While holding Hold A, Hold B, and Reverse B buttons, power on the DLD and then release the buttons. You can see the four Reverse / Holde buttons on Channel A and B are flashing.
4. Turn the Time A switch up and the Time B switch down.
5. Press and hold all 5 buttons for 10 seconds
6. Release all buttons when they all start to flash quickly
7. Turn off the DLD and restart it to complete the factory reset